C++11 设计模式6. 建造者模式,也叫做生成器模式
一 什么是建造者模式?
// 小木公司对于SQL有配置,因此要输入sql url,然后输入 sql username,然后是 sql ps
//因此小木就想到了使用 SystemConfig这个类来完成上述的三个初始化
//5.1号小木公司加入了redis的缓存机制,redis也有 url,username,password,三个字符串
//10.1之后,小木公司加入了kafka机制,让log都存储到kafka中,kafka也有url,username,password,三个字符串
//说不定过年后,还有加上其他配置项。这时候小木意识到问题的严重性了,
//每次改动都一堆参数,且容易出现问题
// 小木公司对于SQL有配置,因此要输入sql url,然后输入 sql username,然后是 sql ps
//因此小木就想到了使用 SystemConfig这个类来完成上述的三个初始化//5.1号小木公司加入了redis的缓存机制,redis也有 url,username,password,三个字符串//10.1之后,小木公司加入了kafka机制,让log都存储到kafka中,kafka也有url,username,password,三个字符串//说不定过年后,还有加上其他配置项。这时候小木意识到问题的严重性了,
//每次改动都一堆参数,且容易出现问题
#include <iostream>
#include <string>
using namespace std;class SystemConfig {public:SystemConfig(string sqlurl,string sqlusername,string sqlpassword,string redisurl, string redisusername, string redispassword,string kafkaurl, string kafkausername, string kafkapassword): MySQL_URL(sqlurl), MySQL_username(sqlusername), MySQL_password(sqlpassword),REDIS_URL(redisurl), REDIS_username(redisusername), REDIS_password(redispassword),KAFKA_URL(kafkaurl), KAFKA_username(kafkausername), KAFKA_password(kafkapassword){}void printfSysConfig() {cout << "MySQL_URL = " << MySQL_URL<< "   MySQL_username = " << MySQL_username<< "   MySQL_password = " << MySQL_password<< "   REDIS_URL = " << REDIS_URL<< "   REDIS_username = " << REDIS_username<< "   REDIS_password = " << REDIS_password<< "   KAFKA_URL = " << KAFKA_URL<< "   KAFKA_username = " << KAFKA_username<< "   KAFKA_password = " << KAFKA_password<< endl;}
private:string MySQL_URL;string MySQL_username;string MySQL_password;//5.1之后string REDIS_URL;string REDIS_username;string REDIS_password;//10.1之后string KAFKA_URL;string KAFKA_username;string KAFKA_password;
};//想到的第一解决方案是:我们将这些属性都弄成函数,class SystemConfig1 {public:SystemConfig1() {}void setMySQLConfig(string sqlurl, string sqlusername, string sqlpassword) {this->MySQL_URL = sqlurl;this->MySQL_username = sqlusername;this->MySQL_password = sqlpassword;}void setRedisConfig(string redisurl, string redisusername, string redispassword) {this->REDIS_URL = redisurl;this->REDIS_username = redisusername;this->REDIS_password = redispassword;}void setKAFKAConfig(string kafkaurl, string kafkausername, string kafkapassword) {this->KAFKA_URL = kafkaurl;this->KAFKA_username = kafkausername;this->KAFKA_password = kafkapassword;}void printfSysConfig() {cout << "MySQL_URL = " << MySQL_URL<< "   MySQL_username = " << MySQL_username<< "   MySQL_password = " << MySQL_password<< "   REDIS_URL = " << REDIS_URL<< "   REDIS_username = " << REDIS_username<< "   REDIS_password = " << REDIS_password<< "   KAFKA_URL = " << KAFKA_URL<< "   KAFKA_username = " << KAFKA_username<< "   KAFKA_password = " << KAFKA_password<< endl;}
private:string MySQL_URL;string MySQL_username;string MySQL_password;//5.1之后string REDIS_URL;string REDIS_username;string REDIS_password;//10.1之后string KAFKA_URL;string KAFKA_username;string KAFKA_password;
};//构造者模式
//创建一个sustemconfig的build类,创建systemconfig的过程全都交给这个systemconfig类来实现class SystemConfig2 {
public:SystemConfig2() {}void printfSysConfig() {cout << "MySQL_URL = " << MySQL_URL<< "   MySQL_username = " << MySQL_username<< "   MySQL_password = " << MySQL_password<< "   REDIS_URL = " << REDIS_URL<< "   REDIS_username = " << REDIS_username<< "   REDIS_password = " << REDIS_password<< "   KAFKA_URL = " << KAFKA_URL<< "   KAFKA_username = " << KAFKA_username<< "   KAFKA_password = " << KAFKA_password<< endl;}
public:string MySQL_URL;string MySQL_username;string MySQL_password;//5.1之后string REDIS_URL;string REDIS_username;string REDIS_password;//10.1之后string KAFKA_URL;string KAFKA_username;string KAFKA_password;
};class SystemConfig2Build {public:SystemConfig2Build() {}SystemConfig2 & getSystemConfig() {return systemconfig;}void setMySQLConfig(string sqlurl, string sqlusername, string sqlpassword) {systemconfig.MySQL_URL = sqlurl;systemconfig.MySQL_username = sqlusername;systemconfig.MySQL_password = sqlpassword;}void setRedisConfig(string redisurl, string redisusername, string redispassword) {systemconfig.REDIS_URL = redisurl;systemconfig.REDIS_username = redisusername;systemconfig.REDIS_password = redispassword;}void setKAFKAConfig(string kafkaurl, string kafkausername, string kafkapassword) {systemconfig.KAFKA_URL = kafkaurl;systemconfig.KAFKA_username = kafkausername;systemconfig.KAFKA_password = kafkapassword;}private:SystemConfig2  systemconfig;
};class CompanyA {
public:virtual SystemConfig2 & buildSystemConfig() {scbuild2.setMySQLConfig("11a", "22a", "33a");scbuild2.setRedisConfig("44a", "55a", "66a");scbuild2.setKAFKAConfig("77a", "88a", "99a");return scbuild2.getSystemConfig();}private:SystemConfig2Build scbuild2;
};class CompanyB {
public:SystemConfig2 & buildSystemConfig() {scbuild2.setMySQLConfig("11B", "22B", "33B");scbuild2.setRedisConfig("44B", "55B", "66B");scbuild2.setKAFKAConfig("77B", "88B", "99B");return scbuild2.getSystemConfig();}private:SystemConfig2Build scbuild2;
};class CompanyDiect {
public:virtual SystemConfig2 & buildSystemConfig() = 0;virtual ~CompanyDiect() {//注意父类的 析构函数 要写成 virtual形式的。}
private:SystemConfig2Build scbuild2;
};//c公司
class CompanyDiectc:public CompanyDiect {
public:virtual SystemConfig2 & buildSystemConfig() {scbuild2.setMySQLConfig("11c", "22c", "33c");scbuild2.setRedisConfig("44c", "55c", "66c");scbuild2.setKAFKAConfig("77c", "88c", "99c");return scbuild2.getSystemConfig();}private:SystemConfig2Build scbuild2;
};class CompanyDiectd :public CompanyDiect {
public:virtual SystemConfig2 & buildSystemConfig() {scbuild2.setMySQLConfig("11d", "22d", "33d");scbuild2.setRedisConfig("44d", "55d", "66d");scbuild2.setKAFKAConfig("77d", "88d", "99d");return scbuild2.getSystemConfig();}private:SystemConfig2Build scbuild2;
};int main()
{_CrtSetDbgFlag(_CRTDBG_ALLOC_MEM_DF | _CRTDBG_LEAK_CHECK_DF);//程序退出时检测内存泄漏并显示到“输出”窗口std::cout << "Hello World!\n";SystemConfig sc = SystemConfig("aa","bb","cc","dd","ee","ff","11","22","33");sc.printfSysConfig();//首先想到的fix方案,但是有个问题,就是开出来了public接口,让user可以调用,这不怎么好。//也就是说破坏了原有的systemConfig的封装性,让user可以有机会再次改动。虽然不得不这么干。SystemConfig1 sc1 = SystemConfig1();sc1.setMySQLConfig("SQL11", "SQL22", "SQL33");sc1.setRedisConfig("redis1", "redis2", "redis3");sc1.setKAFKAConfig("kafka1", "kafka2", "kafka3");sc1.printfSysConfig();//构造者模式的调用SystemConfig2Build scbuild2;scbuild2.setMySQLConfig("11", "22", "33");scbuild2.setRedisConfig("44", "55", "66");scbuild2.setKAFKAConfig("77", "88", "99");SystemConfig2 sc2 = scbuild2.getSystemConfig();sc2.printfSysConfig();//我们看到上述构造者模式的调用,每次都要传递参数进入,实际开发中,我们可能对于A,B公司的配置基本是不变的,也就是说,我们需要一些预选项CompanyA ca;SystemConfig2 sca = ca.buildSystemConfig();sca.printfSysConfig();//B公司CompanyB cB;SystemConfig2 scB = cB.buildSystemConfig();scB.printfSysConfig();//我们看代码知道 CompanyA 和 CompanyB 的代码是完全一样的,因此可以抽取成父类,这样CompanyDiect * comabs;comabs = new CompanyDiectc(); //多态完成SystemConfig2 scconn = comabs->buildSystemConfig();scconn.printfSysConfig();delete comabs;}
建造者模式(也被成为⽣成器模式),是⼀种创建型设计模式,软件开发过程中有的时候需要创建很复杂的对象,⽽建造者模式的主要思想是将对象的构建过程分为多个步骤,并为每个步骤定义⼀个抽象的接⼝。具体的构建过程由实现了这些接⼝的具体建造者类来完成。同时有⼀个指导者类负责协调建造者的⼯作,按照⼀定的顺序或逻辑来执⾏构建步骤,最终⽣成产品。
举个例⼦,假如我们要创建⼀个计算机对象,计算机由很多组件组成,例如 CPU、内存、硬盘、显卡等。每个组件可能有不同的型号、配置和制造,这个时候计算机就可以被视为⼀个复杂对象,构建过程相对复杂,⽽我们使⽤建造者模式将计算机的构建过程封装在⼀个具体的建造者类中,⽽指导者类则负责指导构建的步骤和顺序。每个具体的建造者类可以负责构建不同型号或配置的计算机,客户端代码可以通过选择不同的建造者来创建不同类型的计算机,这样就可以根据需要构建不同表示的复杂对象,更加灵活。
假设我们要创建一个计算机对象,普通的写法如下:
// 004构建者模式.cpp : 此文件包含 "main" 函数。程序执行将在此处开始并结束。
//#include <iostream>
#include <string>
using namespace std;//cpu
class CPU {
public:CPU(string cpuname) :_cpuname(cpuname) {cout << "CPU 构造方法被调用 _cpuname = " << _cpuname << endl;}
public:string _cpuname;};class Memory {
public:Memory(string memname) :_memname(memname) {cout << "Memory 构造方法被调用 _memname = " << memname << endl;}
public:string _memname;
};class Harddisk {
public:Harddisk(string diskname) :_diskname(diskname) {cout << "Harddisk 构造方法被调用 diskname = " << diskname << endl;}
public:string _diskname;
};class GraphicsCard {
public:GraphicsCard(string gcname) :_gcname(gcname) {cout << "GraphicsCard 构造方法被调用 _gcname = " << _gcname << endl;}
public:string _gcname;
};//如果是普通的写法
//假如我们要创建⼀个计算机对象,计算机由很多组件组成,
//例如 CPU、内存、硬盘、显卡等。
//每个组件可能有不同的型号、配置和制造,
//这个时候计算机就可以被视为⼀个复杂对象
class Computer {
public:Computer(CPU *cpu, Memory *mem, Harddisk *hdisk, GraphicsCard *gc):_cpu(cpu),_mem(mem),_hdisk(hdisk),_gc(gc) {cout << "Computer 构造方法被调用" << endl;}~Computer() {cout << "Computer 析构方法被调用" << endl;}void printfCom() {cout << "cpu = " << this->_cpu->_cpuname<< "   mem = " << this->_mem->_memname<< "   hdisk = " << this->_hdisk->_diskname<< "   gc = " << this->_gc->_gcname<<endl;}
protected:CPU *_cpu;Memory *_mem;Harddisk *_hdisk;GraphicsCard *_gc;
};int main()
{std::cout << "Hello World!\n";CPU cpu("intelcpu");Memory mem("sanxingmem");Harddisk disk("xindisk");GraphicsCard gc("huaweixianka");Computer comA(&cpu,&mem,&disk,&gc);comA.printfCom();//这里有个问题,如果我们创建的cpmputer比较多,又有不同的型号,那么很容易写错。//创建者模型就是解决这个问题
}
和继承的写法结合在一起
// 004构建者模式正确的写法.cpp : 此文件包含 "main" 函数。程序执行将在此处开始并结束。
//#include <iostream>
#include <string>
using namespace std;//使用构造者模式创建
class CPUBase {
public:CPUBase(string cpuname) :_cpuname(cpuname) {cout << "CPUBase 构造方法被调用 _cpuname = " << _cpuname << endl;}public:string _cpuname;
};class HuaweiCpu : public CPUBase {
public:HuaweiCpu(string cpuname) :CPUBase(cpuname) {cout << "HuaweiCpu 构造方法被调用 _cpuname = " << _cpuname << endl;}
};
class xiaomiCpu : public CPUBase {
public:xiaomiCpu(string cpuname) :CPUBase(cpuname) {cout << "xiaomiCpu 构造方法被调用 _cpuname = " << _cpuname << endl;}
};
class lianxiangCpu : public CPUBase {
public:lianxiangCpu(string cpuname) :CPUBase(cpuname) {cout << "lianxiangCpu 构造方法被调用 _cpuname = " << _cpuname << endl;}
};class MemoryBase {
public:MemoryBase(string memname) :_memname(memname) {cout << "MemoryBase 构造方法被调用 _memname = " << memname << endl;}
public:string _memname;
};
class huaweiMemory :public MemoryBase {
public:huaweiMemory(string memname) :MemoryBase(memname) {cout << "huaweiMemory 构造方法被调用 _memname = " << memname << endl;}
};
class xiaomiMemory :public MemoryBase {
public:xiaomiMemory(string memname) :MemoryBase(memname) {cout << "xiaomiMemory 构造方法被调用 _memname = " << memname << endl;}
};
class lianxiangMemory :public MemoryBase {
public:lianxiangMemory(string memname) :MemoryBase(memname) {cout << "lianxiangMemory 构造方法被调用 _memname = " << memname << endl;}
};class HarddiskBase {
public:HarddiskBase(string diskname) :_diskname(diskname) {cout << "HarddiskBase 构造方法被调用 diskname = " << diskname << endl;}
public:string _diskname;
};
class huaweiHarddisk :public HarddiskBase {
public:huaweiHarddisk(string diskname) :HarddiskBase(diskname) {cout << "huaweiHarddisk 构造方法被调用 _diskname = " << diskname << endl;}
};
class xiaomiHarddisk :public HarddiskBase {
public:xiaomiHarddisk(string diskname) :HarddiskBase(diskname) {cout << "xiaomiHarddisk 构造方法被调用 diskname = " << diskname << endl;}
};
class lianxiangHarddisk :public HarddiskBase {
public:lianxiangHarddisk(string diskname) :HarddiskBase(diskname) {cout << "lianxiangHarddisk 构造方法被调用 diskname = " << diskname << endl;}
};class GraphicsCardBase {
public:GraphicsCardBase(string gcname) :_gcname(gcname) {cout << "GraphicsCardBase 构造方法被调用 _gcname = " << _gcname << endl;}
public:string _gcname;
};
class huaweiGraphicsCard :public GraphicsCardBase {
public:huaweiGraphicsCard(string gcname) :GraphicsCardBase(gcname) {cout << "huaweiHarddisk 构造方法被调用 gcname = " << gcname << endl;}
};
class xiaomiGraphicsCard :public GraphicsCardBase {
public:xiaomiGraphicsCard(string gcname) :GraphicsCardBase(gcname) {cout << "xiaomiGraphicsCard 构造方法被调用 gcname = " << gcname << endl;}
};
class lianxiangGraphicsCard :public GraphicsCardBase {
public:lianxiangGraphicsCard(string gcname) :GraphicsCardBase(gcname) {cout << "lianxiangGraphicsCard 构造方法被调用 gcname = " << gcname << endl;}
};class ComputerBase {public:virtual ~ComputerBase() {};void printComputerBase() {cout << "_cpuBase = " << this->_cpuBase<< "   _memBase = " << this->_memBase<< "   _hdiskBase = " << this->_hdiskBase<< "   _gcBase = " << this->_gcBase<< endl;}// 一般需要给私有的成员属性提供读写接口CPUBase* GetCPUBase() {return this->_cpuBase;}void SetCPUBase(CPUBase* cpubase) {this->_cpuBase = cpubase;}MemoryBase* GetMemoryBase() {return this->_memBase;}void SetMemoryBase(MemoryBase* membase) {this->_memBase = membase;}HarddiskBase* GetHarddiskBase() {return this->_hdiskBase;}void SetHarddiskBase(HarddiskBase* hdiskBase) {this->_hdiskBase = hdiskBase;}GraphicsCardBase* GetGraphicsCardBase() {return this->_gcBase;}void SetGraphicsCardBase(GraphicsCardBase* gcBase) {this->_gcBase = gcBase;}protected:CPUBase *_cpuBase;MemoryBase *_memBase;HarddiskBase *_hdiskBase;GraphicsCardBase *_gcBase;
};class huaweiComputer :public ComputerBase {};class lianxiangComputer :public ComputerBase {};class xiaomiComputer :public ComputerBase {};//构建器父类
class ComputerBaseBuilder {
public:virtual ~ComputerBaseBuilder() {};virtual void loadCPU(string cpubase) = 0;virtual void loadMem(string membase) = 0;virtual void loaddisk(string diskbase) = 0;virtual void loadGraphicsCard(string graphicsCardbase) = 0;ComputerBase * getCompBase() {return m_compBase;}
protected:ComputerBase *m_compBase;
};class huaweiComputerBuild :public ComputerBaseBuilder {
public:huaweiComputerBuild() {m_compBase = new huaweiComputer();}virtual void loadCPU(string strmodelno) {CPUBase *cpu = nullptr;if (strmodelno == "001") {cpu = new HuaweiCpu("huaweicpu");}if (strmodelno == "002") {cpu = new xiaomiCpu("xiaomicpu");}if (strmodelno == "003") {cpu = new lianxiangCpu("lianxiangcpu");}cout << "huaweiComputerBuild loadCPU" << endl;m_compBase->SetCPUBase(cpu);}virtual void loadMem(string strmodelno) {MemoryBase *memBase = nullptr;if (strmodelno == "001") {memBase = new huaweiMemory("huaweimemory");}if (strmodelno == "002") {memBase = new xiaomiMemory("xiaomimemory");}if (strmodelno == "003") {memBase = new lianxiangMemory("lianxiangmemory");}cout << "huaweiComputerBuild loadmemory" << endl;m_compBase->SetMemoryBase(memBase);}virtual void loaddisk(string strmodelno) {HarddiskBase *hdiskBase = nullptr;if (strmodelno == "001") {hdiskBase = new huaweiHarddisk("huaweidisk");}if (strmodelno == "002") {hdiskBase = new xiaomiHarddisk("xiaomidisk");}if (strmodelno == "003") {hdiskBase = new lianxiangHarddisk("lianxiangdisk");}cout << "huaweiComputerBuild loaddisk" << endl;m_compBase->SetHarddiskBase(hdiskBase);}virtual void loadGraphicsCard(string strmodelno) {GraphicsCardBase *_gcBase = nullptr;if (strmodelno == "001") {_gcBase = new huaweiGraphicsCard("huaweigc");}if (strmodelno == "002") {_gcBase = new xiaomiGraphicsCard("huaweigc");}if (strmodelno == "003") {_gcBase = new lianxiangGraphicsCard("huaweigc");}cout << "huaweiComputerBuild loadgcbase" << endl;m_compBase->SetGraphicsCardBase(_gcBase);}~huaweiComputerBuild() {}
};class lianxiangComputerBuild :public ComputerBaseBuilder {
public:lianxiangComputerBuild() {m_compBase = new lianxiangComputer();}virtual void loadCPU(string strmodelno) {CPUBase *cpu = nullptr;if (strmodelno == "001") {cpu = new HuaweiCpu("huaweicpu");}if (strmodelno == "002") {cpu = new xiaomiCpu("xiaomicpu");}if (strmodelno == "003") {cpu = new lianxiangCpu("lianxiangcpu");}cout << "huaweiComputerBuild loadCPU" << endl;m_compBase->SetCPUBase(cpu);}virtual void loadMem(string strmodelno) {MemoryBase *memBase = nullptr;if (strmodelno == "001") {memBase = new huaweiMemory("huaweimemory");}if (strmodelno == "002") {memBase = new xiaomiMemory("xiaomimemory");}if (strmodelno == "003") {memBase = new lianxiangMemory("lianxiangmemory");}cout << "huaweiComputerBuild loadmemory" << endl;m_compBase->SetMemoryBase(memBase);}virtual void loaddisk(string strmodelno) {HarddiskBase *hdiskBase = nullptr;if (strmodelno == "001") {hdiskBase = new huaweiHarddisk("huaweidisk");}if (strmodelno == "002") {hdiskBase = new xiaomiHarddisk("xiaomidisk");}if (strmodelno == "003") {hdiskBase = new lianxiangHarddisk("lianxiangdisk");}cout << "huaweiComputerBuild loaddisk" << endl;m_compBase->SetHarddiskBase(hdiskBase);}virtual void loadGraphicsCard(string strmodelno) {GraphicsCardBase *_gcBase = nullptr;if (strmodelno == "001") {_gcBase = new huaweiGraphicsCard("huaweigc");}if (strmodelno == "002") {_gcBase = new xiaomiGraphicsCard("huaweigc");}if (strmodelno == "003") {_gcBase = new lianxiangGraphicsCard("huaweigc");}cout << "huaweiComputerBuild loadgcbase" << endl;m_compBase->SetGraphicsCardBase(_gcBase);}~lianxiangComputerBuild() {}
};class xiaomiComputerBuild :public ComputerBaseBuilder {
public:xiaomiComputerBuild() {m_compBase = new xiaomiComputer();}virtual void loadCPU(string strmodelno) {CPUBase *cpu = nullptr;if (strmodelno == "001") {cpu = new HuaweiCpu("huaweicpu");}if (strmodelno == "002") {cpu = new xiaomiCpu("xiaomicpu");}if (strmodelno == "003") {cpu = new lianxiangCpu("lianxiangcpu");}cout << "huaweiComputerBuild loadCPU" << endl;m_compBase->SetCPUBase(cpu);}virtual void loadMem(string strmodelno) {MemoryBase *memBase = nullptr;if (strmodelno == "001") {memBase = new huaweiMemory("huaweimemory");}if (strmodelno == "002") {memBase = new xiaomiMemory("xiaomimemory");}if (strmodelno == "003") {memBase = new lianxiangMemory("lianxiangmemory");}cout << "huaweiComputerBuild loadmemory" << endl;m_compBase->SetMemoryBase(memBase);}virtual void loaddisk(string strmodelno) {HarddiskBase *hdiskBase = nullptr;if (strmodelno == "001") {hdiskBase = new huaweiHarddisk("huaweidisk");}if (strmodelno == "002") {hdiskBase = new xiaomiHarddisk("xiaomidisk");}if (strmodelno == "003") {hdiskBase = new lianxiangHarddisk("lianxiangdisk");}cout << "huaweiComputerBuild loaddisk" << endl;m_compBase->SetHarddiskBase(hdiskBase);}virtual void loadGraphicsCard(string strmodelno) {GraphicsCardBase *_gcBase = nullptr;if (strmodelno == "001") {_gcBase = new huaweiGraphicsCard("huaweigc");}if (strmodelno == "002") {_gcBase = new xiaomiGraphicsCard("xiaomigc");}if (strmodelno == "003") {_gcBase = new lianxiangGraphicsCard("lianxianggc");}cout << "huaweiComputerBuild loadgcbase" << endl;m_compBase->SetGraphicsCardBase(_gcBase);}~xiaomiComputerBuild() {}
};//指挥者类
class ComputerDirector {public:ComputerDirector(ComputerBaseBuilder *computerBaseBuilder) {this->m_pComputerBaseBuilder = computerBaseBuilder;}//指定新的构建器void SetBuilder(ComputerBaseBuilder* ptmpBuilder){m_pComputerBaseBuilder = ptmpBuilder;}//原MonsterBuilder类中的Assemble成员函数ComputerBase *Construct(string strmodelno) //参数:模型编号,形如:“002001003001”等。每些位的组合都有一些特别的含义,这里不需要探究。{m_pComputerBaseBuilder->loadCPU(strmodelno.substr(0, 3));m_pComputerBaseBuilder->loadMem(strmodelno.substr(3, 3));m_pComputerBaseBuilder->loaddisk(strmodelno.substr(6, 3));m_pComputerBaseBuilder->loadGraphicsCard(strmodelno.substr(9, 3));return m_pComputerBaseBuilder->getCompBase();}private:ComputerBaseBuilder* m_pComputerBaseBuilder; //指向所有构建器类的父类
};int main()
{_CrtSetDbgFlag(_CRTDBG_ALLOC_MEM_DF | _CRTDBG_LEAK_CHECK_DF);//程序退出时检测内存泄漏并显示到“输出”窗口xiaomiComputerBuild* xiaocomp = new xiaomiComputerBuild();ComputerDirector *cd = new ComputerDirector(xiaocomp);ComputerBase *combase = cd->Construct("001001001001");delete(combase->GetCPUBase());delete(combase->GetMemoryBase());delete(combase->GetHarddiskBase());delete(combase->GetGraphicsCardBase());combase->printComputerBase();delete combase;delete cd;delete xiaocomp;
}
相关文章:

C++11 设计模式6. 建造者模式,也叫做生成器模式
一 什么是建造者模式? // 小木公司对于SQL有配置,因此要输入sql url,然后输入 sql username,然后是 sql ps //因此小木就想到了使用 SystemConfig这个类来完成上述的三个初始化 //5.1号小木公司加入了redis的缓存机制࿰…...

GPS与精致农业 无人机应用 农业遥感 农业类
全球定位系统是美国国防部主要为满足军事部门对海上、陆地和空中设施进行高精度导航和定位的要求而建立的。GPS系统最基本的特点是以“多星、高轨、高频、测量-测距”为体制,以高精度的原子钟为核心。GPS作为新一代卫星导航与定位系统,不仅具有全球性、全…...

Kotlin注解简介
Kotlin注解 注解(Annotations)在 Kotlin 中和在 Java 中有类似的地位,它们都是元数据的形式,为代码提供了额外的信息。注解不会直接影响代码的操作,但可以被编译器或者运行时环境用来生成额外的代码、进行类型检查、处…...

代码随想录训练营
Day45代码随想录 322.零钱兑换 1.题目描述 给你一个整数数组 coins ,表示不同面额的硬币;以及一个整数 amount ,表示总金额。 计算并返回可以凑成总金额所需的 最少的硬币个数 。如果没有任何一种硬币组合能组成总金额,返回 -…...
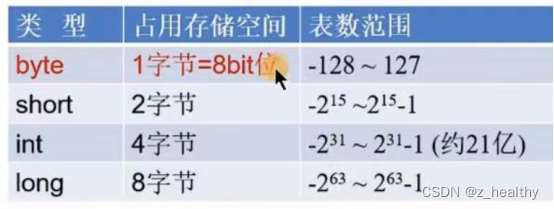
java中的变量、数据类型、人机交互
变量 变量要素 1、类型;每一个变量都需要定义类型(强类型)其它语言有弱类型(js) 2、变量名; 3、存储的值; 声明方式: 数据类型 变量名 变量值; public static vo…...

Python中的生成器是什么
生成器的工作原理 只要Python函数的主体中有yield关键字,该函数就是生成器函数。调用生成器函数,返回一个生成器对象。也就是说,生成器函数是生成器工厂。 下面以一个简单的函数说明生成器的行为: def gen123():yield 1yield 2yield 3print(gen123) # <function gen…...

【Camera2完整流程分析四】从log角度分析CameraService启动流程
下面直接带你通过log打印来一起读CameraService启动的过程。 1)Camera service对象构建,在启动的时候先创建CameraService 这里会打印: CameraService: CameraService started (pid=559)接着启动的时候会执行 –》onFirstRef() 进入这里面看,先输出打印: CameraService:…...

基于SSM SpringBoot vue教务排课系统
基于SSM SpringBoot vue教务排课系统 系统功能 登录 个人中心 学生信息管理 教师信息管理 课室信息管理 班级信息管理 系别信息管理 专业信息管理 课程信息管理 选课信息管理 课表信息管理 开发环境和技术 开发语言:Java 使用框架: SSM(Spring SpringMVC Myba…...
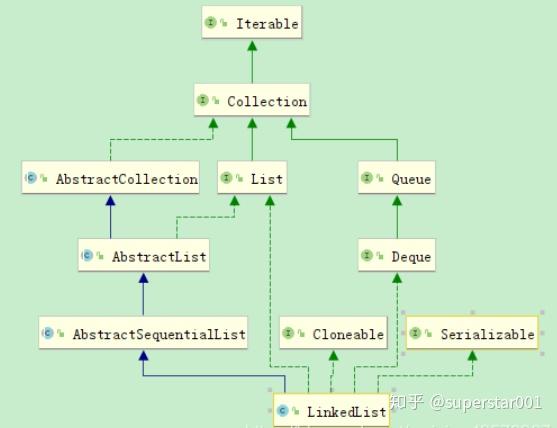
深入理解 LinkedList 及底层源码分析
LinkedList 是基于链表结构的一种 List,在分析 LinkedList 源码前我们先对对链表结构做一个简单的了解。 一、链表的概念 链表是由一系列非连续的节点组成的存储结构,简单分下类的话,链表又分为_单向链表和双向链表,而单向 / 双…...

美易官方:英伟达业绩将难以撑起股价?
美股市场似乎总是对各大公司的业绩表现抱有极大的期待,就像一个永远填不饱的“巨胃”。在这样的市场环境下,即使是业绩骄人的公司也可能难以支撑其股价。英伟达,这家在图形处理单元(GPU)领域享有盛誉的公司,…...

超实用干货!FP独立站引流攻略
在当前的市场环境下,对于希望继续从事FP和黑五类产品销售的商家来说,搭建独立站绝对是一个明智的选择。没有了第三方平台的限制,拥有自己的独立站意味着你可以完全掌控自己的商业策略和操作。 但脱离了平台,独立站推广会更加困难。…...

php之框架底层中间件模式开发实现、array_reduce的应用
众所周知php框架的中间件核心是通过array_reduce实现的 php之框架中间件模式开发实现、array_reduce的应用 1.先写个测试用例看一下函数的特性2.根据执行特性实现中间件 1.先写个测试用例看一下函数的特性 <?phpfunction kernal($a,$b){return $a . " and " .…...

fabric搭建生产网络
fabric搭建生产网络 一、生成组织结构与身份证书 解包 hyperledger-fabric-linux-amd64-2.5.0.tar.gz 1.1、crypto-config.yaml配置文件 ./bin/cryptogen showtemplate > crypto-config.yaml 将crypto-config.yaml内容修改为: # -------------------------…...

聊聊 ASP.NET Core 中间件(二):中间件和筛选器的区别
前言 有些小伙伴看到上一篇文章后,可能会发现中间件和我们之前讲的筛选器非常类似,比如它们都是通过 next 串起来的一系列的组件,并且都可以在请求处理前后执行代码,都可以通过不执行 next 来进行请求的终止。那么筛选器和中间件…...

Nginx配置Https缺少SSL模块
1、Linux下Nginx配置https nginx下载和安装此处就忽略,可自行百度 1.1、配置https 打开nginx配置文件 vim /opt/app/nginx/conf/nginx.conf相关https配置 server {listen 443 ssl; #开放端口server_name echarts.net;#域名#redirect to https#ssl on; #旧版#ssl证…...
超详细——集成学习——Adaboost实现多分类——附代码
资料参考 1.【集成学习】boosting与bagging_哔哩哔哩_bilibili 集成学习——boosting与bagging 强学习器:效果好,模型复杂 弱学习器:效果不是很好,模型简单 优点 集成学习通过将多个学习器进行结合,常可获得比单一…...
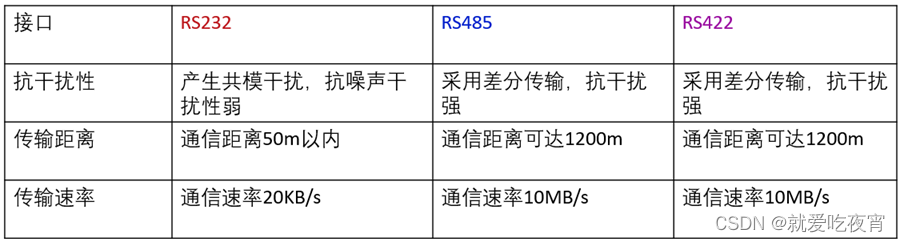
串口通信标准RS232 RS485 RS422的区别
很多工程师经常把RS-232、RS-422、RS-485称为通讯协议,其实这是不对的,它们仅仅是关于串口通讯的一个机械和电气接口标准(顶多是网络协议中的物理层),不是通讯协议,那它们又有哪些区别呢: 第一…...

jdk环境安装
jdk安装 创建软件安装的目录 mkdir -p /bigdata/{soft,server} /bigdata/soft 安装文件的存放目录 /bigdata/server 软件安装的目录 把安装的软件上传到/bigdata/soft 目录 解压到指定目录 -C :指定解压到指定目录 tar -zxvf /bigdata/soft/jdk-8u241-linux-x64.tar.gz -C /b…...
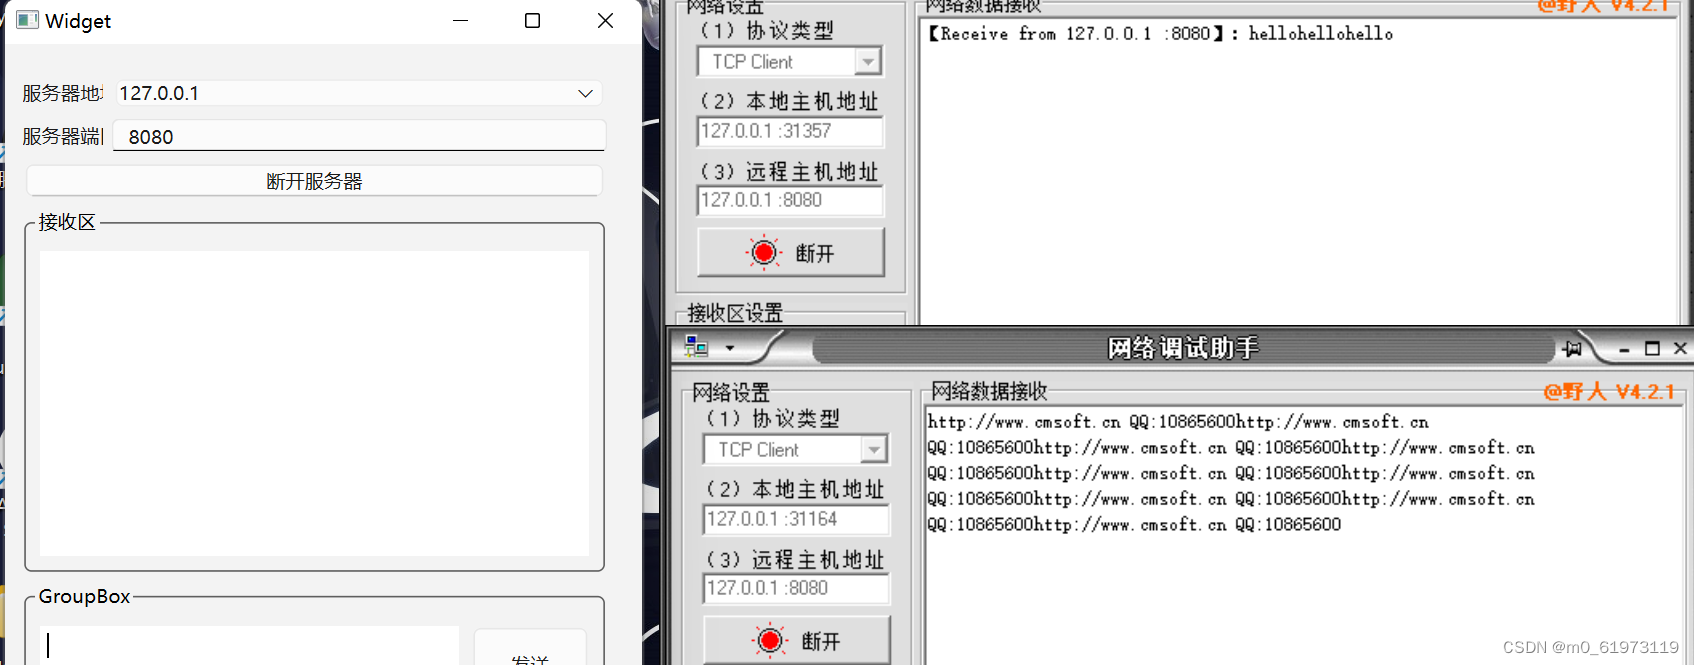
QT+网络调试助手+TCP服务器
一、UI界面设计 二、单线程 代码设计 1、 查找合法的本地地址,用于当作服务器的IP地址 #include <QThread> #include <QTcpSocket> #include <QNetworkInterface> #include <QMessageBox>QList<QHostAddress> ipAddressesList QNe…...
场景)
【unity】(1)场景
Unity的场景(Scene)是构建游戏中各种环境和级别的基础。一个场景可以包含游戏中的所有对象,如角色、道具、地形等。 创建和管理场景 创建新场景: 在Unity编辑器中,选择File > New Scene,或者使用快捷键…...

网络安全有哪些岗位?如何成为一名优秀的网络安全工程师?
网络安全有哪些岗位?如何成为一名优秀的网络安全工程师? 网络安全是什么? 首先说一下什么是网络安全?其中,网络安全工程师工作内容具体有哪些? 网络安全 确保网络系统的硬件、软件及其系统中的数据受到保护…...

终极Windows风扇控制指南:5分钟掌握智能调速告别噪音烦恼
终极Windows风扇控制指南:5分钟掌握智能调速告别噪音烦恼 【免费下载链接】FanControl.Releases This is the release repository for Fan Control, a highly customizable fan controlling software for Windows. 项目地址: https://gitcode.com/GitHub_Trending…...

如何用智能去重工具高效清理重复图片:AntiDupl.NET完整使用指南
如何用智能去重工具高效清理重复图片:AntiDupl.NET完整使用指南 【免费下载链接】AntiDupl A program to search similar and defect pictures on the disk 项目地址: https://gitcode.com/gh_mirrors/an/AntiDupl 你是否曾面对电脑里杂乱无章的图片库感到束…...

麦肯锡AI揭秘:AI的真正价值不在算法,而在重构组织与结构竞争力
【摘者按:麦肯锡在《The State of AI 2025》报告中深刻指出,AI的真正价值早已超越了单纯的算法性能,其核心在于通过“重构”来重塑企业的组织与结构竞争力。当企业走出“试点炼狱”,不再将AI视为简单的技术堆砌,而是将…...

从MobileNet到HRNet:如何为你的DeepLabV3+项目挑选最合适的PyTorch骨干网络?
从MobileNet到HRNet:DeepLabV3骨干网络选型实战指南 当你面对Pascal VOC数据集上89%的mIoU和Cityscapes上82.1%的基准成绩时,是否思考过这些数字背后隐藏的工程抉择?在图像分割领域,骨干网络的选择往往决定着项目成败——它既影响…...

生物信息学流水线效率翻倍:在Linux集群上为fastp v0.23.4配置多线程与批量处理脚本
生物信息学流水线效率翻倍:在Linux集群上为fastp v0.23.4配置多线程与批量处理脚本 当实验室的测序仪每天吐出TB级的FASTQ文件时,生物信息工程师的终端里往往挤满了等待处理的nohup进程。我们曾用三台服务器连续运行72小时才完成某批800个样本的质控——…...

Windows HEIC缩略图解决方案:告别格式壁垒,实现跨平台无缝浏览
Windows HEIC缩略图解决方案:告别格式壁垒,实现跨平台无缝浏览 【免费下载链接】windows-heic-thumbnails Enable Windows Explorer to display thumbnails for HEIC/HEIF files 项目地址: https://gitcode.com/gh_mirrors/wi/windows-heic-thumbnails…...

2026 酒店无人直播服务商推荐:警惕一次性收费陷阱,用心服务才是核心
"一次购买,无任何后续费用!"—— 这样的宣传语让不少酒店经营者心动不已,以为找到了低成本获客的捷径。然而,现实往往事与愿违:软件使用不到1个月,算力耗尽无法开播;直播间频繁卡顿、…...

PNetLab-vs-EVE-NG安全性分析
1 PNetLab vs EVE-NG社区版:从一次CVE看"免费fork"的安全代价 1.1 痛点引入 2025年11月,CVE-2025-63749被公开披露——PNetLab 5.3.11存在命令注入漏洞,攻击者通过qemu_options参数注入$(/bin/bash -c reverse_shell),…...

3分钟掌握Typora LaTeX主题:用Markdown写出专业学术论文的终极指南
3分钟掌握Typora LaTeX主题:用Markdown写出专业学术论文的终极指南 【免费下载链接】typora-latex-theme 将Typora伪装成LaTeX的中文样式主题,本科生轻量级课程论文撰写的好帮手。This is a theme disguising Typora into Chinese LaTeX style. 项目地…...