第八章 使用Apache服务部署静态网站
文章目录
- 第八章 使用Apache服务部署静态网站
- 一、网站服务程序
- 1、网站服务介绍
- 2、Apache程序介绍
- 二、配置服务文件参数
- 1、Linux系统中的配置文件
- 2、配置httpd服务程序时最常用的参数以及用途描述
- 三、SELinux安全子系统
- 1、SELinux介绍
- 2、SELinux服务配置模式
- 3、Semanage命令
- 4、Semanage命令中常用的参数以及作用
- 四、个人用户主页功能
- 1、开启主页功能
- 2、在用户家目录中配置相关文件
- 3、重启服务
- 4、访问网站
- 5、修改SELinux策略规则
- 6、重启服务
- 7、访问网站
- 8、生成密码数据库
- 9、编辑用户主页的配置文件
- 10、重启服务
- 11、访问网站
- 五、虚拟网站主机功能
- 1、基于IP地址
- (1)、编辑网卡
- (2)、重启网卡
- (3)、创建网站目录并编辑首页文件
- (4)、编辑配置文件
- (5)、设置SELinux
- (6)、重启服务
- (7)、访问网站
- 2、基于主机域名
- (1)、编辑hosts文件
- (2)、创建目录并编辑网站首页内容
- (3)、编辑配置文件
- (4)、设置SELinux
- (5)、重启服务
- (6)、访问网站
- 2、基于端口号
- (1)、创建目录并编辑网站首页
- (2)、添加端口
- (3)、设置SELinux
- (4)、查询过滤所有与HTTP协议并且SELinux服务允许的端口列表
- (5)、手动添加端口并重启服务
- (6)、访问网站
- 六、Apache的访问控制
- 1、创建目录并编辑网站首页
- 2、编辑配置文件
- 3、重启服务
- 4、访问网站
第八章 使用Apache服务部署静态网站
一、网站服务程序
1、网站服务介绍
网站服务就是指Web网络服务,一般是只允许用户通过浏览器访问到互联网中各种资源的服务。Web网络服务是一种被动访问的服务程序,即只有接收到互联网中其他主机发出的请求后才会响应,最终用于提供服务程序的Web服务器,会通过HTTP(超文本传输协议)或者HTTPS(安全超文本传输协议)把请求的内容传送给用户。
2、Apache程序介绍
Apache程序是目前拥有很高市场占有率的Web服务程序之一其跨平台和安全性广泛被认可且拥有快速、可靠、简单的API扩展。Apache服务程序可以运行在Linux系统、Unix系统甚至是Windows系统中,支持基于IP、域名和端口号的虚拟主机功能,支持多种认证方式,集成有代理服务器模块、安全Socket层(SSL),能够实时监视服务状态与定制日志消息,并有着各类丰富的模块支持。
二、配置服务文件参数
1、Linux系统中的配置文件
| 文件名称 | 作用 |
|---|---|
| /etc/httpd | 服务目录 |
| /etc/httpd/conf/httpd.conf | 主配置文件 |
| /var/www/html | 网站数据目录 |
| /var/log/httpd/access_log | 访问日志 |
| /var/log/httpd/error_log | 错误日志 |
2、配置httpd服务程序时最常用的参数以及用途描述
| 参数 | 作用 |
|---|---|
| ServerRoot | 服务目录 |
| ServerAdmin | 管理员邮箱 |
| User | 运行服务的用户 |
| Group | 运行服务的用户组 |
| ServerName | 网站服务器的域名 |
| DocumentRoot | 网站数据目录 |
| Listen | 监听的IP地址和端口号 |
| DirectoryIndex | 默认的索引页页面 |
| ErrorLog | 错误日志文件 |
| CustomLog | 访问日志文件 |
| Timeout | 网页超时时间,默认为300秒 |
三、SELinux安全子系统
1、SELinux介绍
SELinux(Security-Enhanced Linux)是美国国家安全局在Linux开源社区的帮助下开发的一个强制访问控制(MAC,Mandatory Access Control)的安全子系统。Linux系统使用SELinux技术的目的是为了让各个服务进程都受到约束,使其仅获取到本应获取的资源。
2、SELinux服务配置模式
第一种:enforcing:强制启用安全策略模式,将拦截服务的不合法请求。
第二种:permissive:遇到服务越权访问时,只发出警告而不强制拦截。
第三种:disabled:对于越权的行为不警告也不拦截
3、Semanage命令
semanage命令用于管理SELinux的策略,英文全称为:“SELinux manage”。
语法格式:semanage [参数] [文件]
4、Semanage命令中常用的参数以及作用
| 参数 | 作用 |
|---|---|
| -l | 查询 |
| -a | 添加 |
| -m | 修改 |
| -d | 删除 |
四、个人用户主页功能
1、开启主页功能
//第17行添加井号(#)
//第24行去掉井号(#)
[root@centos ~]# vim /etc/httpd/conf.d/userdir.conf
1 #
2 # UserDir: The name of the directory that is appended onto a user's home
3 # directory if a ~user request is received.
4 #
5 # The path to the end user account 'public_html' directory must be
6 # accessible to the webserver userid.  This usually means that ~userid
7 # must have permissions of 711, ~userid/public_html must have permissions
8 # of 755, and documents contained therein must be world-readable.
9 # Otherwise, the client will only receive a "403 Forbidden" message.
10 #
11 <IfModule mod_userdir.c>
12     #
13     # UserDir is disabled by default since it can confirm the presence
14     # of a username on the system (depending on home directory
15     # permissions).
16     #
17     # UserDir disabled
18
19     #
20     # To enable requests to /~user/ to serve the user's public_html
21     # directory, remove the "UserDir disabled" line above, and uncomment
22     # the following line instead:
23     #
24     UserDir public_html
25 </IfModule>
26
27 #
28 # Control access to UserDir directories.  The following is an example
29 # for a site where these directories are restricted to read-only.
30 #
31 <Directory "/home/*/public_html">
32     AllowOverride FileInfo AuthConfig Limit Indexes
33     Options MultiViews Indexes SymLinksIfOwnerMatch IncludesNoExec
34     Require method GET POST OPTIONS
35 </Directory>
2、在用户家目录中配置相关文件
//切换普通用户
[root@centos ~]# su - centos
//创建目录
[centos@centos ~]$ mkdir pubic_html
//编辑网站首页内容
[centos@centos ~]$ echo "Welcome to my website!" > pubic_html/index.html
//家目录权限为755,保证其他用户也有quanx
[centos@centos ~]$ chmod 775 /home/centos/
3、重启服务
//退出普通用户登录
[centos@centos ~]$ exit
注销
//重启httpd服务程序
[root@centos ~]# systemctl restart httpd.service
4、访问网站
http://192.168.2.22/~centos

5、修改SELinux策略规则
[root@centos ~]# setsebool -P httpd_enable_homedirs on
6、重启服务
[root@centos ~]# systemctl restart httpd
7、访问网站
http://192.168.2.22/~centos

8、生成密码数据库
[root@centos ~]# htpasswd -c /etc/httpd/passwd centos
New password: 	//密码
Re-type new password: 	//重新输入密码
Adding password for user centos
9、编辑用户主页的配置文件
[root@centos ~]# vim /etc/httpd/conf.d/userdir.conf
1 #
2 # UserDir: The name of the directory that is appended onto a user's home
3 # directory if a ~user request is received.
4 #
5 # The path to the end user account 'public_html' directory must be
6 # accessible to the webserver userid.  This usually means that ~userid
7 # must have permissions of 711, ~userid/public_html must have permissions
8 # of 755, and documents contained therein must be world-readable.
9 # Otherwise, the client will only receive a "403 Forbidden" message.
10 #
11 <IfModule mod_userdir.c>
12     #
13     # UserDir is disabled by default since it can confirm the presence
14     # of a username on the system (depending on home directory
15     # permissions).
16     #
17     # UserDir disabled
18
19     #
20     # To enable requests to /~user/ to serve the user's public_html
21     # directory, remove the "UserDir disabled" line above, and uncomment
22     # the following line instead:
23     #
24     UserDir public_html
25 </IfModule>
26
27 #
28 # Control access to UserDir directories.  The following is an example
29 # for a site where these directories are restricted to read-only.
30 #
31 <Directory "/home/*/public_html">
32    AllowOverride all
33    authuserfile "/etc/httpd/passwd"
34    authname "My privately website"
35    authtype basic
36    require user centos
37 </Directory>
10、重启服务
[root@centos ~]# systemctl restart httpd
11、访问网站
http://192.168.2.22/~centos/


五、虚拟网站主机功能
1、基于IP地址
(1)、编辑网卡
[root@centos ~]# nmtui

(2)、重启网卡
[root@centos ~]# nmcli connection up ens160
连接已成功激活(D-Bus 活动路径:/org/freedesktop/NetworkManager/ActiveConnection/4)
(3)、创建网站目录并编辑首页文件
//创建网站目录
[root@centos ~]# mkdir -p /home/wwwroot/10
[root@centos ~]# mkdir -p /home/wwwroot/20
[root@centos ~]# mkdir -p /home/wwwroot/30
//编辑网站首页文件
[root@centos ~]# echo "IP:192.168.2.10" > /home/wwwroot/10/index.html
[root@centos ~]# echo "IP:192.168.2.20" > /home/wwwroot/20/index.html
[root@centos ~]# echo "IP:192.168.2.30" > /home/wwwroot/30/index.html
(4)、编辑配置文件
[root@centos ~]# vim /etc/httpd/conf/httpd.conf
133 <VirtualHost 192.168.2.10>
134     DocumentRoot /home/wwwroot/10
135     ServerName www.aaa.com
136     <Directory /home/wwwroot/10>
137     AllowOverride None
138     Require all granted
139     </Directory>
140 </VirtualHost>
141
142 <VirtualHost 192.168.2.20>
143     DocumentRoot /home/wwwroot/20
144     ServerName www.bbb.com
145     <Directory /home/wwwroot/20>
146     AllowOverride None
147     Require all granted
148     </Directory>
149 </VirtualHost>
150
151 <VirtualHost 192.168.2.30>
152     DocumentRoot /home/wwwroot/30
153     ServerName www.ccc.com
154     <Directory /home/wwwroot/30>
155     AllowOverride None
156     Require all granted
157     </Directory>
158 </VirtualHost>
(5)、设置SELinux
[root@centos ~]# semanage fcontext -a -t httpd_sys_content_t /home/wwwroot
[root@centos ~]# semanage fcontext -a -t httpd_sys_content_t /home/wwwroot/10
[root@centos ~]# semanage fcontext -a -t httpd_sys_content_t /home/wwwroot/10/*
[root@centos ~]# semanage fcontext -a -t httpd_sys_content_t /home/wwwroot/20
[root@centos ~]# semanage fcontext -a -t httpd_sys_content_t /home/wwwroot/20/*
[root@centos ~]# semanage fcontext -a -t httpd_sys_content_t /home/wwwroot/30
[root@centos ~]# semanage fcontext -a -t httpd_sys_content_t /home/wwwroot/30/*
[root@centos ~]# restorecon -Rv /home/wwwroot/
Relabeled /home/wwwroot from unconfined_u:object_r:user_home_dir_t:s0 to unconfined_u:object_r:httpd_sys_content_t:s0
Relabeled /home/wwwroot/10 from unconfined_u:object_r:user_home_t:s0 to unconfined_u:object_r:httpd_sys_content_t:s0
Relabeled /home/wwwroot/10/index.html from unconfined_u:object_r:user_home_t:s0 to unconfined_u:object_r:httpd_sys_content_t:s0
Relabeled /home/wwwroot/20 from unconfined_u:object_r:user_home_t:s0 to unconfined_u:object_r:httpd_sys_content_t:s0
Relabeled /home/wwwroot/20/index.html from unconfined_u:object_r:user_home_t:s0 to unconfined_u:object_r:httpd_sys_content_t:s0
Relabeled /home/wwwroot/30 from unconfined_u:object_r:user_home_t:s0 to unconfined_u:object_r:httpd_sys_content_t:s0
Relabeled /home/wwwroot/30/index.html from unconfined_u:object_r:user_home_t:s0 to unconfined_u:object_r:httpd_sys_content_t:s0
(6)、重启服务
[root@centos ~]# systemctl restart httpd.service
(7)、访问网站
http://192.168.2.10/
http://192.168.2.20/
http://192.168.2.30/


2、基于主机域名
(1)、编辑hosts文件
[root@centos ~]# vim /etc/hosts
127.0.0.1   localhost localhost.localdomain localhost4 localhost4.localdomain4
::1         localhost localhost.localdomain localhost6 localhost6.localdomain6
192.168.2.10 www.aaa.com
192.168.2.20 www.bbb.com
192.168.2.30 www.ccc.com
(2)、创建目录并编辑网站首页内容
//创建目录
[root@centos ~]# mkdir -p /home/wwwroot/aaa
[root@centos ~]# mkdir -p /home/wwwroot/bbb
[root@centos ~]# mkdir -p /home/wwwroot/ccc
//编辑网站首页内容
[root@centos ~]# echo "www.aaa.com" > /home/wwwroot/aaa/index.html
[root@centos ~]# echo "www.bbb.com" > /home/wwwroot/bbb/index.html
[root@centos ~]# echo "www.ccc.com" > /home/wwwroot/ccc/index.html
(3)、编辑配置文件
[root@centos ~]# vim /etc/httpd/conf/httpd.conf
133 <VirtualHost 192.168.2.10>
134     DocumentRoot /home/wwwroot/aaa
135     ServerName www.aaa.com
136     <Directory /home/wwwroot/aaa>
137     AllowOverride None
138     Require all granted
139     </Directory>
140 </VirtualHost>
141
142 <VirtualHost 192.168.2.20>
143     DocumentRoot /home/wwwroot/bbb
144     ServerName www.bbb.com
145     <Directory /home/wwwroot/bbb>
146     AllowOverride None
147     Require all granted
148     </Directory>
149 </VirtualHost>
150
151 <VirtualHost 192.168.2.30>
152     DocumentRoot /home/wwwroot/ccc
153     ServerName www.ccc.com
154     <Directory /home/wwwroot/ccc>
155     AllowOverride None
156     Require all granted
157     </Directory>
158 </VirtualHost>
(4)、设置SELinux
[root@centos ~]# semanage fcontext -a -t httpd_sys_content_t /home/wwwroot
[root@centos ~]# semanage fcontext -a -t httpd_sys_content_t /home/wwwroot/aaa
[root@centos ~]# semanage fcontext -a -t httpd_sys_content_t /home/wwwroot/aaa/*
[root@centos ~]# semanage fcontext -a -t httpd_sys_content_t /home/wwwroot/bbb
[root@centos ~]# semanage fcontext -a -t httpd_sys_content_t /home/wwwroot/bbb/*
[root@centos ~]# semanage fcontext -a -t httpd_sys_content_t /home/wwwroot/ccc
[root@centos ~]# semanage fcontext -a -t httpd_sys_content_t /home/wwwroot/ccc/*
[root@centos ~]# restorecon -Rv /home/wwwroot/
(5)、重启服务
[root@centos ~]# systemctl restart httpd.service
(6)、访问网站
http://192.168.2.10/
http://www.aaa.com/
http://192.168.2.20/
http://www.bbb.com/
http://192.168.2.30/
http://www.ccc.com/


2、基于端口号
(1)、创建目录并编辑网站首页
//创建目录
[root@centos ~]# mkdir -p /home/wwwroot/6111
[root@centos ~]# mkdir -p /home/wwwroot/6222
[root@centos ~]# mkdir -p /home/wwwroot/6333
//编辑网站首页
[root@centos ~]# echo "port:6111" > /home/wwwroot/6111/index.html
[root@centos ~]# echo "port:6222" > /home/wwwroot/6222/index.html
[root@centos ~]# echo "port:6333" > /home/wwwroot/6333/index.html
(2)、添加端口
[root@centos ~]# vim /etc/httpd/conf/httpd.conf 45 Listen 8046 Listen 611147 Listen 622248 Listen 6333
135 <VirtualHost 192.168.2.10:6111>
136     DocumentRoot /home/wwwroot/6111
137     ServerName www.aaa.com
138     <Directory /home/wwwroot/6111>
139     AllowOverride None
140     Require all granted
141     </Directory>
142 </VirtualHost>
143
144 <VirtualHost 192.168.2.20:6222>
145     DocumentRoot /home/wwwroot/6222
146     ServerName www.bbb.com
147     <Directory /home/wwwroot/6222>
148     AllowOverride None
149     Require all granted
150     </Directory>
151 </VirtualHost>
152
153 <VirtualHost 192.168.2.30:6333>
154     DocumentRoot /home/wwwroot/6333
155     ServerName www.ccc.com
156     <Directory /home/wwwroot/6333>
157     AllowOverride None
158     Require all granted
159     </Directory>
160 </VirtualHost>
(3)、设置SELinux
[root@centos ~]# semanage fcontext -a -t httpd_sys_content_t /home/wwwroot
[root@centos ~]# semanage fcontext -a -t httpd_sys_content_t /home/wwwroot/6111
[root@centos ~]# semanage fcontext -a -t httpd_sys_content_t /home/wwwroot/6111/*
[root@centos ~]# semanage fcontext -a -t httpd_sys_content_t /home/wwwroot/6222
[root@centos ~]# semanage fcontext -a -t httpd_sys_content_t /home/wwwroot/6222/*
[root@centos ~]# semanage fcontext -a -t httpd_sys_content_t /home/wwwroot/6333
[root@centos ~]# semanage fcontext -a -t httpd_sys_content_t /home/wwwroot/6333/*
[root@centos ~]# restorecon -Rv /home/wwwroot/
(4)、查询过滤所有与HTTP协议并且SELinux服务允许的端口列表
[root@centos ~]# semanage port -l | grep http
http_cache_port_t              tcp      8080, 8118, 8123, 10001-10010
http_cache_port_t              udp      3130
http_port_t                    tcp      80, 81, 443, 488, 8008, 8009, 8443, 9000
pegasus_http_port_t            tcp      5988
pegasus_https_port_t           tcp      5989
(5)、手动添加端口并重启服务
//添加端口
[root@centos ~]# semanage port -a -t http_port_t -p tcp 6111
[root@centos ~]# semanage port -a -t http_port_t -p tcp 6222
[root@centos ~]# semanage port -a -t http_port_t -p tcp 6333
//重启服务
[root@centos ~]# systemctl restart httpd.service
(6)、访问网站
http://192.168.2.10:6111/
http://192.168.2.20:6222/
http://192.168.2.30:6333/


六、Apache的访问控制
1、创建目录并编辑网站首页
[root@centos ~]# mkdir /var/www/html/server
[root@centos ~]# echo "Successful" > /var/www/html/server/index.html
2、编辑配置文件
[root@centos ~]# vim /etc/httpd/conf/httpd.conf
162 <Directory "/var/www/html/server">
163     SetEnvIf User-Agent "Firefox" ff=1
164     Order allow,deny
165     Allow from env=ff
166 </Directory>
3、重启服务
[root@centos ~]# systemctl restart httpd.service
4、访问网站
http://192.168.2.10/server/

相关文章:
第八章 使用Apache服务部署静态网站
文章目录 第八章 使用Apache服务部署静态网站一、网站服务程序1、网站服务介绍2、Apache程序介绍 二、配置服务文件参数1、Linux系统中的配置文件2、配置httpd服务程序时最常用的参数以及用途描述 三、SELinux安全子系统1、SELinux介绍2、SELinux服务配置模式3、Semanage命令4、…...
Three——四、几何体、高光网络材质、锯齿模糊以及GUI库的使用
文章: Three——一、初识Three以及基础的前端场景搭建(结尾含源码)Three——二、加强对三维空间的认识Three——三、动画执行、画布大小、渲染帧率和相机适配体验Three——四、几何体、高光网络材质、锯齿模糊以及GUI库的使用Three——五、点线模型对象、三角形概念…...
盲目自学网络安全只会成为脚本小子?
前言:我们来看看怎么学才不会成为脚本小子 目录: 一,怎么入门? 1、Web 安全相关概念(2 周)2、熟悉渗透相关工具(3 周)3、渗透实战操作(5 周)4、关注安全圈动…...

文从字顺|程序员须知,如何编写高质量代码
高质量代码是软件开发中至关重要的一部分。高质量的代码不仅可以提高软件的可维护性和可复用性,还可以增强软件的安全性和稳定性。同时,可以降低软件维护成本,提升开发效率,为用户提供更好的使用体验。 写出高质量代码是每个程序…...
PCIe物理层弹性缓存机制(详细)解析-PCIe专题知识(四)
目录 前言一、简介二、详细解析2.1 实例解析2.2 具体实现过程 三、总结四、其他相关链接1、PCI总线及发展历程总结2、PCIe物理层总结-PCIE专题知识(一)3、PCIe数据链路层图文总结-PCIe专题知识(二)4、PCIe物理层链路训练和初始化总…...

分片上传和断点续传的区别?实现思路是什么?
相同: 分片上传和断点续传都是网络传输中常用的重要技术 不同: 分片上传:将一个大文件切分为多个小文件进行上传。这种方式能够加快上传速度,降低服务器压力,特别适用于大型文件的上传。例如,在云存储系统…...
微前端 qiankun@2.10.5 源码分析(二)
微前端 qiankun2.10.5 源码分析(二) 我们继续上一节的内容。 loadApp 方法 找到 src/loader.ts 文件的第 244 行: export async function loadApp<T extends ObjectType>(app: LoadableApp<T>,configuration: FrameworkConfi…...

08异步请求:何种场景下应该使用异步请求?
异步在计算机科学中早就是一个比较常用的词汇,从操作系统的特性( 并发、共享、虚拟、异步)开始,异步就在处理并发操作中起到很大的作用,不仅如此,在软件层面,异步同样也是解决并发请求的一个关键过程,它可以将瞬时激增的请求进行更加灵活的处理,通过异步请求,客户端可…...
【深度学习 | Transformer】Transformers 教程:pipeline一键预测
文章目录 一、前言二、Computer vision2.1 Image classification2.2 Object detection2.3 Image segmentation2.4 Depth estimation 三、NLP3.1 Text classification3.2 Token classification3.3 Question answering3.4 Summarization3.5 Translation3.6 Language modeling3.6.…...
HTMLCSS
1、HTML 1.1 介绍 HTML 是一门语言,所有的网页都是用HTML 这门语言编写出来的,也就是HTML是用来写网页的,像京东,12306等网站有很多网页。 这些都是网页展示出来的效果。而HTML也有专业的解释 HTML(HyperText Markup Language)…...

【安装Nginx】
Linux上安装Nginx 文章目录 Linux上安装NginxUbuntuCentOS查看已安装的软件 Ubuntu 在 Ubuntu 上安装 Nginx 非常简单。只需按照以下步骤操作: 打开终端,更新软件包索引: sudo apt update安装 Nginx: sudo apt install nginx安…...

VSCode作业1:猜数字游戏和简单计数器(包含完整代码)
目录 猜数字游戏 一、使用‘random’函数获取随机数 二、 分情况讨论输入值大小情况 三、HTML代码 四、CSS样式及运行效果 简单计数器(计时器) 一、使用‘setInterval’函数实现计数效果 二、使用’clearInterval‘函数实现暂停计数和重新计数效果 …...

NANK OE骨传导开放式蓝牙耳机发布,极致体验拉满!
近日,中国专业音频品牌NANK南卡发布了全新一代——骨传导开放式蓝牙耳机NANK OE,耳机采用了传统真无线和骨传导的结合方式,带来更加舒适的佩戴体验和音质升级,同时还支持单双耳自由切换,全新的设计收获了市场的喜爱和认…...
看完这篇文章你就彻底懂啦{保姆级讲解}-----(I.MX6U驱动GPIO中断《包括时钟讲解》) 2023.5.9
目录 前言整体文件结构源码分析(保姆级讲解)中断初始化部分初始化GIC控制器初始化中断向量表设置中断向量表偏移 系统时钟初始化部分使能所有的时钟部分led初始化部分beep初始化部分key初始化部分按键中断初始化部分按键中断服务函数部分 while循环部分 …...

MySql -- 事务
目录 1.概念 2.事务的运用场景 3.事务的四大特点 4.执行事务带来的问题 4.1 脏读 4.2 不可重复度 4.3 幻读 5. MySQL中事务的隔离级别 1.概念 事务就是把若干个独立操作打包成一个整体而诞生的一种功能. 2.事务的运用场景 比如:A——>B 转账500 A的余额-500…...

关于大模型对未来影响的一点看法
人们总是高估了未来一到两年的变化,低估了未来十年的变革。 ---比尔盖茨 近来OpenAI的GPT技术可以说在全球都带来了巨大的影响,也让大家看到了什么叫大力出奇迹。chatGPT和GPT4的能力给了大家很大的震撼,其流畅自如、逻辑清晰、出众的能力&am…...

Android - 约束布局 ConstraintLayout
一、概念 解决布局嵌套过多的问题,采用方向约束的方式对控件进行定位。 二、位置约束 2.1 位置 至少要保证水平和垂直方向都至少有一个约束才能确定控件的位置。 layout_constraintLeft_toLeftOf我的左边,与XXX左边对齐。layout_constraintLeft_toRight…...

Addictive Multiplicative in NN
特征交叉是特征工程中的重要环节,在以表格型(或结构化)数据为输入的建模中起到了很关键的作用。 特征交互的作用,一是尽可能挖掘对目标有效的模式、特征,二是具有较好的可解释性,三是能够将对数据的洞见引…...
LeetCode 1206. 实现跳表
不使用任何库函数,设计一个跳表。 跳表是在 O(log(n)) 时间内完成增加、删除、搜索操作的数据结构。跳表相比于树堆与红黑树,其功能与性能相当,并且跳表的代码长度相较下更短,其设计思想与链表相似。 例如,一个跳表包…...
离散数学_九章:关系(2)
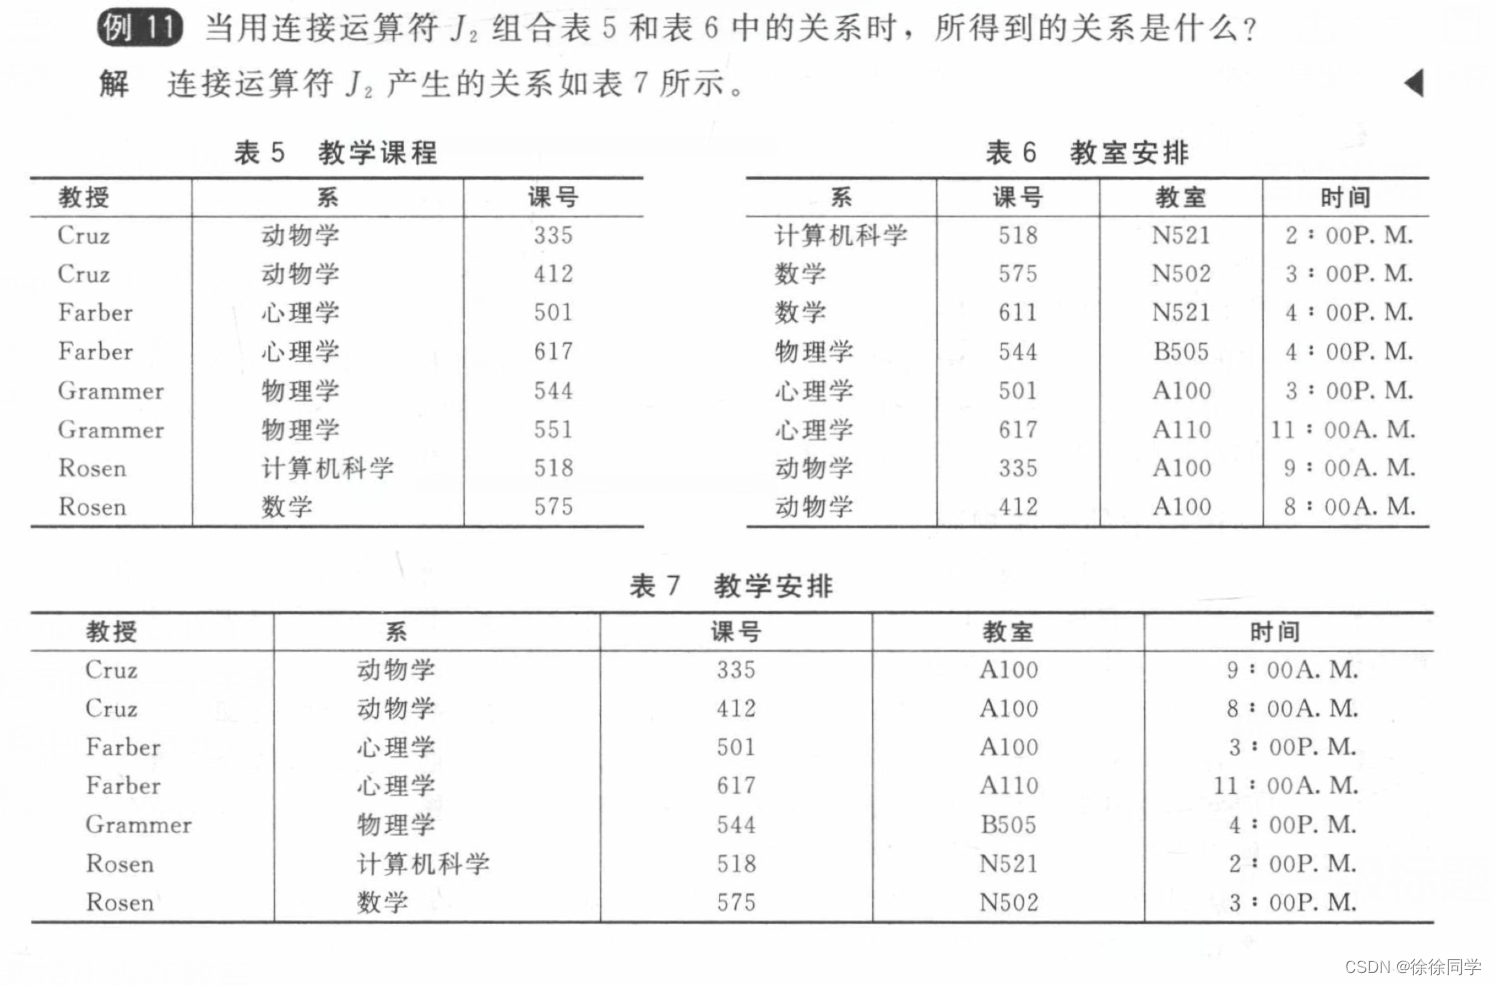
9.2 n元关系及其应用 1、n元关系,关系的域,关系的阶2、数据库和关系 1. 数据库 2. 主键 3. 复合主键 3、n元关系的运算 1. 选择运算 (Select) 2. 投影运算 (Project) 3. 连接运算 (Join) n元关系:两个以上集合的元素间的关系 1、n元关系…...

电力系统时序一致性保障:elec-ops-prediction的长时序稳定性约束实现
电力系统时序一致性保障:elec-ops-prediction的长时序稳定性约束实现 【免费下载链接】elec-ops-prediction elec-ops-prediction 是 CANN 社区 Electrical Engineering SIG(电力行业兴趣小组)旗下的电力负荷预测算子库, 聚焦于电…...

2026 在线水印去除工具怎么选?6款实用方法对比测评
在短视频时代,去水印需求越来越普遍。无论是想要收藏喜欢的视频素材、整理图片库存,还是创作内容时需要的参考素材,高效的在线水印去除方法已经成为必需品。本文盘点了6款在线水印去除工具和方法,从处理速度、平台覆盖、易用性等维…...

OpenHarmony系统定制:实现开机自启动应用与Launcher替换实战
1. 项目概述:为OpenHarmony设备定义“开机即用”的体验最近在基于触觉智能的RK3566开发板上折腾OpenHarmony 4.1,一个很实际的需求浮出水面:如何让系统开机后,默认就打开我指定的应用?这不仅仅是开发者的自娱自乐&…...

Cadence Allegro焊盘设计避坑指南:从SMD到通孔,这些层设置错了板子就废了
Cadence Allegro焊盘设计避坑指南:从SMD到通孔的关键层设置解析 当一块PCB板从设计文件变成实体电路板时,最令人崩溃的莫过于发现焊盘设计不当导致整批产品无法使用。作为使用Cadence Allegro进行PCB设计的工程师,Padstack Editor中的每个参数…...

独立开发者如何借助 Taotoken 以更低成本试验不同大模型效果
🚀 告别海外账号与网络限制!稳定直连全球优质大模型,限时半价接入中。 👉 点击领取海量免费额度 独立开发者如何借助 Taotoken 以更低成本试验不同大模型效果 对于独立开发者或小微创业团队而言,在产品原型或功能验证…...

为OpenClaw工作流配置Taotoken作为统一模型供应商
🚀 告别海外账号与网络限制!稳定直连全球优质大模型,限时半价接入中。 👉 点击领取海量免费额度 为OpenClaw工作流配置Taotoken作为统一模型供应商 如果你正在使用OpenClaw构建复杂的Agent工作流,管理多个Agent的模型…...

Logback彩色日志进阶玩法:自定义颜色规则、区分环境开关,以及文件日志的‘去色’指南
Logback彩色日志进阶实战:从炫彩控制台到严谨生产环境的全链路配置 在软件开发的生命周期中,日志是我们最忠实的伙伴。想象一下深夜调试时,满屏灰白的日志中突然跳出一行醒目的红色ERROR信息——这就是彩色日志赋予我们的"视觉直觉"…...

LM317电源模块的“隐藏参数”与实战避坑:为什么你的空载电压总是不稳?
LM317电源模块的“隐藏参数”与实战避坑:为什么你的空载电压总是不稳? 在电子设计领域,LM317作为经典的可调线性稳压器,几乎出现在每个工程师的备件库中。但当你按照标准电路搭好原型,却发现空载时输出电压飘忽不定——…...

ARM+FPGA异构计算在能源电力领域的核心优势与应用实践
1. 项目概述:为什么是ARMFPGA?最近几年,在能源电力这个对可靠性和实时性要求极高的领域,我观察到一股明显的技术趋势:越来越多的项目开始采用“国产ARM处理器 FPGA”的异构计算架构。这不再是实验室里的概念验证&…...

深入RPMsg-Lite virtqueue:拆解异构多核芯片共享内存通信的‘黑盒子’
深入RPMsg-Lite virtqueue:拆解异构多核芯片共享内存通信的‘黑盒子’ 在现代异构多核芯片设计中,核间通信(IPC)的效率直接决定了系统整体性能。当你在调试一个基于NXP i.MX RT1170的双核系统时,是否曾好奇过ÿ…...