UnityAI——动物迁徙中的跟随实现实例
大家好,我是七七,今天来给大家介绍的是Unity中用操控行为实现的跟随领队行为。
看本文若是想了解和实现,只看本文即可,若是想彻底弄透,建议从七七的游戏AI专栏开始看。
废话不多说,先上视频:
跟随队长
我们的目标是让后面的人跟着领头的人,并遵循一些规则
对于领头的人:
- 随机地移动
- 检测前方是否有人
对于跟随的人;
- 跟的不要太近
- 人与人直接不要拥挤
- 如果发现挡道领头人路了,赶紧让开
我们只需要实现这些规则,就可以得到理想的效果,这与神经网络的思想类似,下面我们就来实现这些规则。
规则1
这个脚本是挂载领头人身上的,目的是在前方LEADER_BEHIND_DIST处画一个圆球,若是说前方有人,则让这些人避开。
using System.Collections;
using System.Collections.Generic;
using UnityEngine;public class DrawGizmos : MonoBehaviour
{public float evadeDistance;public Vector3 center;private Vehicle vehicleScript;private float LEADER_BEHIND_DIST;void Start(){vehicleScript = GetComponent<Vehicle>();LEADER_BEHIND_DIST = 2.0f;}void Update(){center = transform.position + vehicleScript.velocity.normalized * LEADER_BEHIND_DIST;}void OnDrawGizoms(){Gizmos.DrawWireSphere(center, evadeDistance);}
}
规则2
这个脚本是挂在一个空物体上的,目的是生成多个跟随者
using System.Collections;
using System.Collections.Generic;
using UnityEngine;public class GenerateBotsForFollowLeader : MonoBehaviour
{public GameObject botPrefab;public GameObject leader;public int botCount;public float minX = -5f;public float maxX = 5.0f;public float minZ = -5.0f;public float maxZ = 5.0f;public float Yvalue = 1.026003f;void Start(){Vector3 spawnPosition;GameObject bot;for(int i = 0; i < botCount; i++){spawnPosition = new Vector3(Random.Range(minX, maxX), Yvalue, Random.Range(minZ, maxZ));//随机产生一个生成位置bot = Instantiate(botPrefab, spawnPosition, Quaternion.identity) as GameObject;bot.GetComponent<SteeringForLeaderFollowing>().leader = leader;bot.GetComponent<SteeringForEvade>().target = leader;bot.GetComponent<SteeringForEvade>().enabled = false;bot.GetComponent<EvadeController>().leader = leader;}}
}
规则3
这个脚本是挂在跟随者身上的,是为了确定跟随者的路径目标点,即领导人身后LEADER_BEHIND_DIST处
using System.Collections;
using System.Collections.Generic;
using UnityEngine;
[RequireComponent(typeof(SteeringForArrive))]
public class SteeringForLeaderFollowing : Steering
{public Vector3 target;private Vector3 desiredVelocity;//预期速度private Vehicle m_vehicle;//获得被操控的AI角色private float maxSpeed;private bool isPlanar;public GameObject leader;private Vehicle leaderController;private Vector3 leaderVelocity;private float LEADER_BEHIND_DIST=2.0f;private SteeringForArrive arriveScript;private Vector3 randomOffset;void Start(){m_vehicle = GetComponent<Vehicle>();maxSpeed = m_vehicle.maxSpeed;isPlanar = m_vehicle.isPlanar;leaderController=leader.GetComponent<Vehicle>();arriveScript= GetComponent<SteeringForArrive>();//为抵达行为指定目标点arriveScript.target = new GameObject("arriveTarget");arriveScript.target.transform.position = leader.transform.position;}public override Vector3 Force(){leaderVelocity = leaderController.velocity;target=leader.transform.position+LEADER_BEHIND_DIST*(-leaderVelocity).normalized;//计算目标点arriveScript.target.transform.position = target;return new Vector3(0, 0, 0);}
}
规则4
这个脚本是挂在跟随者身上的,目的是为了避免跟随者挡住领导人的路
using System.Collections;
using System.Collections.Generic;
using UnityEngine;public class EvadeController : MonoBehaviour
{public GameObject leader;private Vehicle leaderLocomotion;private Vehicle m_vehicle;private bool isPlanar;private Vector3 leaderAhead;private float LEADER_BEHIND_DIST;private Vector3 dist;public float evadeDistance;private float sqrEvadeDistance;private SteeringForEvade evadeScript;void Start(){leaderLocomotion = leader.GetComponent<Vehicle>();evadeScript= GetComponent<SteeringForEvade>();m_vehicle= GetComponent<Vehicle>();isPlanar=m_vehicle.isPlanar;LEADER_BEHIND_DIST = 2.0f;sqrEvadeDistance=sqrEvadeDistance*sqrEvadeDistance;}void Update(){leaderAhead=leader.transform.position+leaderLocomotion.velocity.normalized*LEADER_BEHIND_DIST;  //计算领队前方的一个点dist = transform.position - leaderAhead;if (isPlanar){dist.y = 0;}if(dist.sqrMagnitude < sqrEvadeDistance){evadeScript.enabled = true;Debug.DrawLine(transform.position, leader.transform.position);}else{evadeScript.enabled = false;}}
}
实现
前提
有3个基类
UnityAI——操控行为编程的主要基类-CSDN博客
第一步
创建一个场景,一个Plane
第二步
创建一个Cube作为领队,起名为Leader,为其挂上三个脚本,如下所示:
using System.Collections;
using System.Collections.Generic;
using UnityEngine;public class AILocomotion : Vehicle
{private CharacterController controller;  //AI�Ľ�ɫ������private Rigidbody theRigidbody;private Vector3 moveDistance;//AI��ɫÿ�ε��ƶ�����void Start(){controller = GetComponent<CharacterController>();theRigidbody = GetComponent<Rigidbody>();moveDistance = new Vector3(0, 0, 0);base.Start();//���û����start��������������ij�ʼ��}//������ز�����FixedUpdate�и���void FixedUpdate(){velocity += acceleration * Time.fixedDeltaTime;//�����ٶ�if (velocity.sqrMagnitude > sqrMaxSpeed)   //��������ٶ�velocity = velocity.normalized * maxSpeed;moveDistance = velocity * Time.fixedDeltaTime;if (isPlanar)  {velocity.y = 0;moveDistance.y = 0;}if (controller != null)//����Ѿ�ΪAI��ɫ���ӽ�ɫ����������ô���ý�ɫ������ʹ���ƶ�controller.SimpleMove(velocity);//�����ɫ��û��ɫ��������ҲûRigidbody//����Rigidbody����Ҫ�ɶ���ѧ�ķ�ʽ�������ƶ�else if (theRigidbody == null || !theRigidbody.isKinematic)transform.position += moveDistance;else //��Rigidbody���ƽ�ɫ���˶�theRigidbody.MovePosition(theRigidbody.position+moveDistance);if(velocity.sqrMagnitude>0.00001)//���³�������ٶȴ���һ����ֵ��Ϊ�˷�ֹ������{Vector3 newForward = Vector3.Slerp(transform.forward, velocity, damping * Time.deltaTime);if(isPlanar)newForward.y = 0;transform.forward = newForward;}//�������߶���gameObject.GetComponent<Animation>().Play("walk");}
}
using System.Collections;
using System.Collections.Generic;
using UnityEngine;public class SteeringForWander : Steering
{public float wanderRadius; //徘徊半径public float wanderDistance; //徘徊距离public float wanderJitter; //每秒加到目标的随即位移的最大值public bool isPlanar;private Vector3 desiredVelocity;//预期速度private Vehicle m_vehicle;//获得被操控的AI角色private float maxSpeed;private Vector3 circleTarget;private Vector3 wanderTarget;void Start(){m_vehicle = GetComponent<Vehicle>();maxSpeed = m_vehicle.maxSpeed;isPlanar = m_vehicle.isPlanar;circleTarget = new Vector3(wanderRadius * 0.707f, 0, wanderRadius * 0.707f);  //选取与安全上的一个点作为初始点}public override Vector3 Force(){Vector3 randomDisplacement = new Vector3((Random.value - 0.5f) * 2 * wanderJitter, (Random.value - 0.5f) * 2 * wanderJitter, (Random.value - 0.5f) * 2 * wanderJitter);if (isPlanar)randomDisplacement.y = 0;circleTarget+=randomDisplacement;//将随机位移加到初始点上circleTarget = wanderRadius * circleTarget.normalized;//由于新位置很可能不在圆周上,因此需要投影到圆周上wanderTarget = m_vehicle.velocity.normalized * wanderDistance + circleTarget + transform.position;//之前计算出的值是相对于AI的,需要转换为世界坐标desiredVelocity = (wanderTarget - transform.position).normalized * maxSpeed;return (desiredVelocity - m_vehicle.velocity);}
}
using System.Collections;
using System.Collections.Generic;
using UnityEngine;public class DrawGizmos : MonoBehaviour
{public float evadeDistance;public Vector3 center;private Vehicle vehicleScript;private float LEADER_BEHIND_DIST;void Start(){vehicleScript = GetComponent<Vehicle>();LEADER_BEHIND_DIST = 2.0f;}void Update(){center = transform.position + vehicleScript.velocity.normalized * LEADER_BEHIND_DIST;}void OnDrawGizoms(){Gizmos.DrawWireSphere(center, evadeDistance);}
}
第三步
创建一个空物体,起名为follersGenerator,用于生成跟随者,并添加脚本
using System.Collections;
using System.Collections.Generic;
using UnityEngine;public class GenerateBotsForFollowLeader : MonoBehaviour
{public GameObject botPrefab;public GameObject leader;public int botCount;public float minX = -5f;public float maxX = 5.0f;public float minZ = -5.0f;public float maxZ = 5.0f;public float Yvalue = 1.026003f;void Start(){Vector3 spawnPosition;GameObject bot;for(int i = 0; i < botCount; i++){spawnPosition = new Vector3(Random.Range(minX, maxX), Yvalue, Random.Range(minZ, maxZ));//随机产生一个生成位置bot = Instantiate(botPrefab, spawnPosition, Quaternion.identity) as GameObject;bot.GetComponent<SteeringForLeaderFollowing>().leader = leader;bot.GetComponent<SteeringForEvade>().target = leader;bot.GetComponent<SteeringForEvade>().enabled = false;bot.GetComponent<EvadeController>().leader = leader;}}
}
第四步
创建一个方块预设,作为跟随者,挂上下列脚本:
using System.Collections;
using System.Collections.Generic;
using UnityEngine;public class AILocomotion : Vehicle
{private CharacterController controller;  //AI�Ľ�ɫ������private Rigidbody theRigidbody;private Vector3 moveDistance;//AI��ɫÿ�ε��ƶ�����void Start(){controller = GetComponent<CharacterController>();theRigidbody = GetComponent<Rigidbody>();moveDistance = new Vector3(0, 0, 0);base.Start();//���û����start��������������ij�ʼ��}//������ز�����FixedUpdate�и���void FixedUpdate(){velocity += acceleration * Time.fixedDeltaTime;//�����ٶ�if (velocity.sqrMagnitude > sqrMaxSpeed)   //��������ٶ�velocity = velocity.normalized * maxSpeed;moveDistance = velocity * Time.fixedDeltaTime;if (isPlanar)  {velocity.y = 0;moveDistance.y = 0;}if (controller != null)//����Ѿ�ΪAI��ɫ���ӽ�ɫ����������ô���ý�ɫ������ʹ���ƶ�controller.SimpleMove(velocity);//�����ɫ��û��ɫ��������ҲûRigidbody//����Rigidbody����Ҫ�ɶ���ѧ�ķ�ʽ�������ƶ�else if (theRigidbody == null || !theRigidbody.isKinematic)transform.position += moveDistance;else //��Rigidbody���ƽ�ɫ���˶�theRigidbody.MovePosition(theRigidbody.position+moveDistance);if(velocity.sqrMagnitude>0.00001)//���³�������ٶȴ���һ����ֵ��Ϊ�˷�ֹ������{Vector3 newForward = Vector3.Slerp(transform.forward, velocity, damping * Time.deltaTime);if(isPlanar)newForward.y = 0;transform.forward = newForward;}//�������߶���gameObject.GetComponent<Animation>().Play("walk");}
}
using System.Collections;
using System.Collections.Generic;
using UnityEngine;public class SteeringForArrive : Steering
{public bool isPlanar = true;public float arrivalDistance = 0.3f;public float characterRadius = 1.2f;public float slowDownDistance;public GameObject target;private Vector3 desiredVelocity;//预期速度private Vehicle m_vehicle;//获得被操控的AI角色private float maxSpeed;void Start(){m_vehicle = GetComponent<Vehicle>();maxSpeed = m_vehicle.maxSpeed;isPlanar = m_vehicle.isPlanar;}public override Vector3 Force(){Vector3 toTarget = target.transform.position - transform.position;Vector3 desiredVelocity;Vector3 returnForce;if (isPlanar)toTarget.y = 0;float distance = toTarget.magnitude;if (distance > slowDownDistance){desiredVelocity = toTarget.normalized * maxSpeed;returnForce = desiredVelocity - m_vehicle.velocity;}else{desiredVelocity = toTarget - m_vehicle.velocity;returnForce = desiredVelocity - m_vehicle.velocity;}return returnForce;}void OnDrawGizmos(){Gizmos.DrawWireSphere(target.transform.position, slowDownDistance);}
}
using System.Collections;
using System.Collections.Generic;
using UnityEngine;
[RequireComponent(typeof(SteeringForArrive))]
public class SteeringForLeaderFollowing : Steering
{public Vector3 target;private Vector3 desiredVelocity;//预期速度private Vehicle m_vehicle;//获得被操控的AI角色private float maxSpeed;private bool isPlanar;public GameObject leader;private Vehicle leaderController;private Vector3 leaderVelocity;private float LEADER_BEHIND_DIST=2.0f;private SteeringForArrive arriveScript;private Vector3 randomOffset;void Start(){m_vehicle = GetComponent<Vehicle>();maxSpeed = m_vehicle.maxSpeed;isPlanar = m_vehicle.isPlanar;leaderController=leader.GetComponent<Vehicle>();arriveScript= GetComponent<SteeringForArrive>();//为抵达行为指定目标点arriveScript.target = new GameObject("arriveTarget");arriveScript.target.transform.position = leader.transform.position;}public override Vector3 Force(){leaderVelocity = leaderController.velocity;target=leader.transform.position+LEADER_BEHIND_DIST*(-leaderVelocity).normalized;//计算目标点arriveScript.target.transform.position = target;return new Vector3(0, 0, 0);}
}
using System.Collections;
using System.Collections.Generic;
using UnityEngine;public class Radar : MonoBehaviour
{private Collider[] colliders;//碰撞体的组数private float timer = 0;//计时器public List<GameObject> neighbors;public float checkInterval = 0.3f;//设置检测的时间间隔public float detectRadius = 10f;//设置邻域半径public LayerMask layersChecked;//设置检测哪一层的游戏对象void Start(){neighbors = new List<GameObject>();}void Update(){timer += Time.deltaTime;if(timer > checkInterval){neighbors.Clear();colliders = Physics.OverlapSphere(transform.position, detectRadius, layersChecked);//查找当前AI角色邻域内的所有碰撞体for(int i = 0; i < colliders.Length; i++)//对于每个检测到的碰撞体,获取Vehicle组件,并且加入邻居列表钟{if (colliders[i].GetComponent<Vehicle>())neighbors.Add(colliders[i].gameObject);}timer = 0;}}
}
using System.Collections;
using System.Collections.Generic;
using UnityEngine;public class SteeringForSeparation : Steering
{public float comforDistance = 1;//可接受的距离public float multiplierInsideComfortDistance = 2;//当AI角色与邻居距离过近时的惩罚因子public override Vector3 Force(){Vector3 steeringForce = new Vector3(0, 0, 0);foreach(GameObject s in GetComponent<Radar>().neighbors)//遍历这个AI角色的邻居列表中的每个邻居{if ((s != null) && (s != this.gameObject)){Vector3 toNeighbor = transform.position - s.transform.position;//计算当前AI角色与邻居s之间的距离float length=toNeighbor.magnitude;steeringForce += toNeighbor.normalized / length;//计算这个邻居引起的操控力if (length < comforDistance)steeringForce *= multiplierInsideComfortDistance;}}return steeringForce;}
}
using System.Collections;
using System.Collections.Generic;
using UnityEngine;public class SteeringForEvade :Steering
{public GameObject target;private Vector3 desiredVelocity;//预期速度private Vehicle m_vehicle;//获得被操控的AI角色private float maxSpeed;void Start(){m_vehicle = GetComponent<Vehicle>();maxSpeed = m_vehicle.maxSpeed;}public override Vector3 Force(){Vector3 toTarget = target.transform.position - transform.position;float lookaheadTime = toTarget.magnitude / (maxSpeed + target.GetComponent<Vehicle>().velocity.magnitude);//向前预测的时间desiredVelocity = (transform.position - (target.transform.position+target.GetComponent<Vehicle>().velocity*lookaheadTime)).normalized * maxSpeed;return (desiredVelocity - m_vehicle.velocity);}
}
using System.Collections;
using System.Collections.Generic;
using UnityEngine;public class EvadeController : MonoBehaviour
{public GameObject leader;private Vehicle leaderLocomotion;private Vehicle m_vehicle;private bool isPlanar;private Vector3 leaderAhead;private float LEADER_BEHIND_DIST;private Vector3 dist;public float evadeDistance;private float sqrEvadeDistance;private SteeringForEvade evadeScript;void Start(){leaderLocomotion = leader.GetComponent<Vehicle>();evadeScript= GetComponent<SteeringForEvade>();m_vehicle= GetComponent<Vehicle>();isPlanar=m_vehicle.isPlanar;LEADER_BEHIND_DIST = 2.0f;sqrEvadeDistance=sqrEvadeDistance*sqrEvadeDistance;}void Update(){leaderAhead=leader.transform.position+leaderLocomotion.velocity.normalized*LEADER_BEHIND_DIST;  //计算领队前方的一个点dist = transform.position - leaderAhead;if (isPlanar){dist.y = 0;}if(dist.sqrMagnitude < sqrEvadeDistance){evadeScript.enabled = true;Debug.DrawLine(transform.position, leader.transform.position);}else{evadeScript.enabled = false;}}
}
收尾
最后再给各个角色装上刚体,设置好Leader等参数就可以了。
很多行为我们都可以通过设定规则来实现,可能乍一看行为很难摸索,但慢慢分析出其中的规则并逐一实现后,问题往往就会被解决
相关文章:

UnityAI——动物迁徙中的跟随实现实例
大家好,我是七七,今天来给大家介绍的是Unity中用操控行为实现的跟随领队行为。 看本文若是想了解和实现,只看本文即可,若是想彻底弄透,建议从七七的游戏AI专栏开始看。 废话不多说,先上视频: …...

堆的应用-----Top k 问题
目录 前言 Topk问题 1.问题描述 2.解决方法 3.代码实现(C/C) 前言 在人工智能算法岗位的面试中,TopK是问得最多的几个问题之一: 到底有几种方法? 这些方案里蕴含的优化思路究竟是怎么样的? 为啥T…...

11月14日星期二今日早报简报微语报早读
11月14日星期二,农历十月初二,早报微语早读。 1、江西南城县:限时发放购房补贴政策,三孩家庭每平方米最高补贴500元; 2、2023年中国内地电影市场累计票房突破500亿元; 3、市场监管总局:在全国…...
Spark读取excel文件
文章目录 一、excel数据源转成csv二、Spark读取csv文件(一)启动spark-shell(二)读取csv生成df(三)查看df内容一、excel数据源转成csv 集群bigdata - ubuntu: 192.168.191.19master(bigdata1) - centos: 192.168.23.78 slave1(bigdata2) - centos: 192.168.23.79 slave2(b…...
LLM大语言模型(典型ChatGPT)入门指南
文章目录 一、基础概念学习篇1.1 langchain视频学习笔记1.2 Finetune LLM视频学习笔记 二、实践篇2.1 预先下载模型:2.2 LangChain2.3 Colab demo2.3 text-generation-webui 三、国内项目实践langchain-chatchat 一、基础概念学习篇 1.1 langchain视频学习笔记 lan…...
Spring IOC - Bean的生命周期之实例化
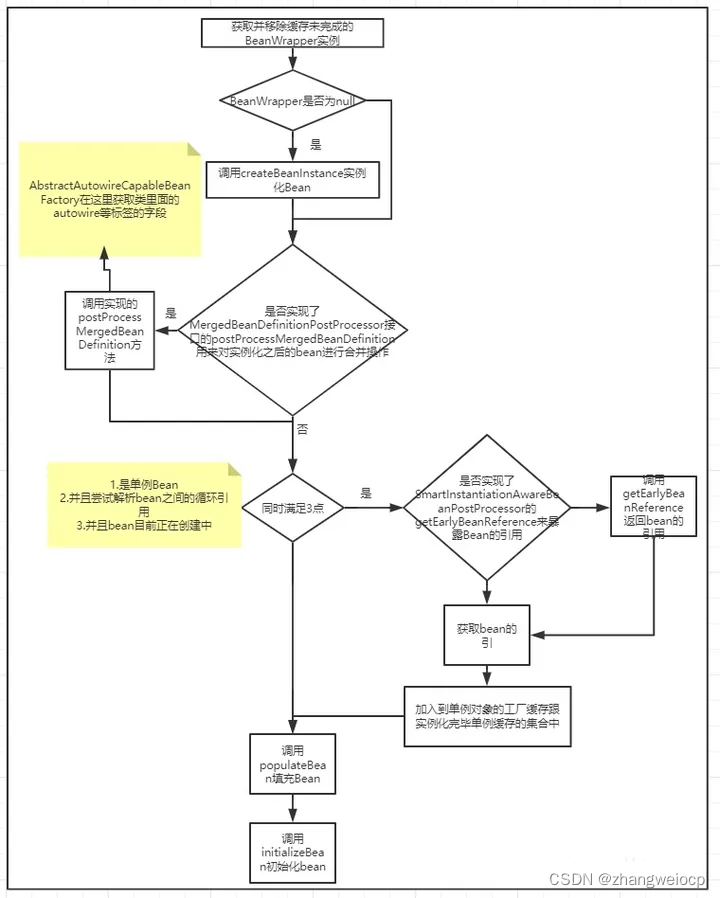
在Spring启动流程文章中讲到,容器的初始化是从refresh方法开始的,其在初始化的过程中会调用finishBeanFactoryInitialization方法。 而在该方法中则会调用DefaultListableBeanFactory#preInstantiateSingletons方法,该方法的核心作用是初始化…...

前端 BUG 总结
文章目录 CSS 样式1、Chrome 89 版本期不再支持 /deep/,请勿使用嵌套 /deep/2、圆角按钮 button 点击后出现矩形框线3、怪异模式4、border 1 像素在手机上显示问题5、文本溢出问题 JavaScript 脚本1、移动端点击穿透2、使用parseInt时必须补全第二个参数 radix3、有…...

【蓝桥杯软件赛 零基础备赛20周】第3周——填空题
报名明年4月蓝桥杯软件赛的同学们,如果你是大一零基础,目前懵懂中,不知该怎么办,可以看看本博客系列:备赛20周合集 20周的完整安排请点击:20周计划 文章目录 00. 2023年第14届参赛数据0. 上一周答疑1. 填空…...
Pytorch自动混合精度的计算:torch.cuda.amp.autocast
1 autocast介绍 1.1 什么是AMP? 默认情况下,大多数深度学习框架都采用32位浮点算法进行训练。2017年,NVIDIA研究了一种用于混合精度训练的方法,该方法在训练网络时将单精度(FP32)与半精度(FP16)结合在一起ÿ…...

一文看懂香港优才计划和高才通计划的区别和优势?如何选?
一文看懂香港优才计划和高才通计划的区别和优势?如何选? 为什么很多人都渴望有个香港身份? 英文这里和内地文化相近,语言相通,同时税率较低、没有外汇管制,有稳定金融体制和良好的营商环境,诸多…...

DTC Network旗下代币DSTC大蒜头即将上线,市场热度飙升
全球数字资产领导者DTC Network宣布其代币DSTC(大蒜头)即将于近期上线,引发市场广泛关注。DTC Network以其创新性的区块链技术和多维度的网络构建,致力于打造一个融合Web3.0、元宇宙和DAPP应用的去中心化聚合公共平台,…...
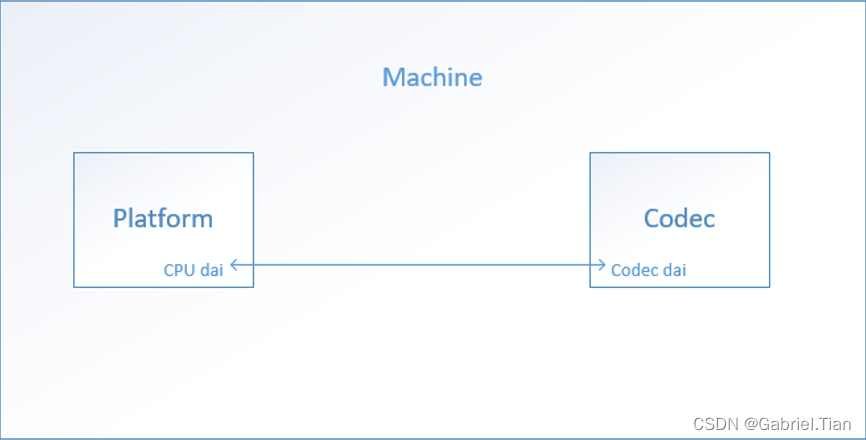
高通SDX12:ASoC 音频框架浅析
一、简介 ASoC–ALSA System on Chip ,是建立在标准ALSA驱动层上,为了更好地支持嵌入式处理器和移动设备中的音频Codec的一套软件体系。 本文基于高通SDX12平台,对ASoC框架做一个分析。 二、整体框架 1. 硬件层面 嵌入式Linux设备的Audio subsystem可以划分为Machine(板…...

国际化:i18n
什么是国际化? 国际化也称作i18n,其来源是英文单词 internationalization的首末字符和n,18为中间的字符数。由于软件发行可能面向多个国家,对于不同国家的用户,软件显示不同语言的过程就是国际化。通常来讲࿰…...

【机器学习5】无监督学习聚类
相比于监督学习, 非监督学习的输入数据没有标签信息, 需要通过算法模型来挖掘数据内在的结构和模式。 非监督学习主要包含两大类学习方法: 数据聚类和特征变量关联。 1 K均值聚类及优化及改进模型 1.1 K-means 聚类是在事先并不知道任何样…...

风景照片不够清晰锐利,四招帮你轻松解决
我们大家在拍摄风景照的时候都希望能够拍摄出清晰锐利的照片。可能会有人问:“什么是锐利?”我们可以从锐度来给大家简单解说下。锐度是反映图片平面清晰度和图像边缘对比度的一个参数。锐度较高的画面,微小的细节部分也会表现得很清晰&#…...

List中的迭代器实现【C++】
List中的迭代器实现【C】 一. list的结构二. 迭代器的区别三. 迭代器的实现i. 类的设计ii. 重载iii. !重载iiii. begin()iiiii. end()iiiii. operator* 四.测试五. const迭代器的实现i. 实现ii 优化实现 六. 整体代码 一. list的结构 其实按照习惯来说,应该要专门出…...
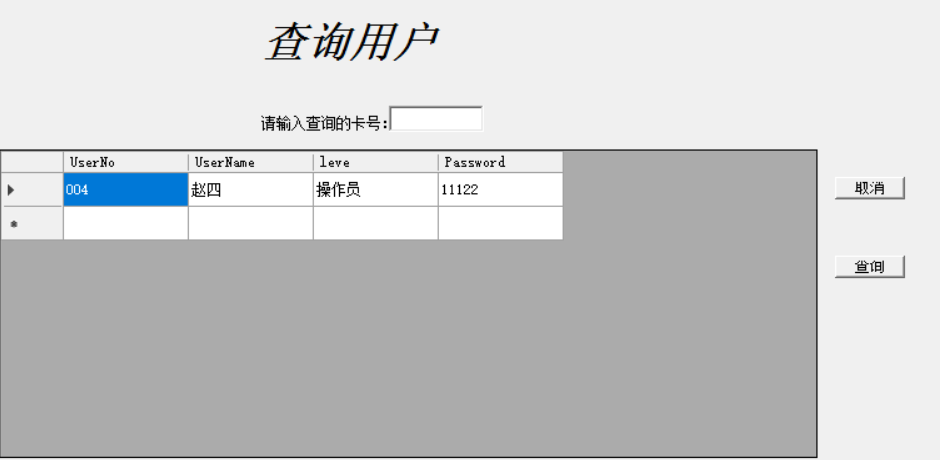
VB.NET三层之用户查询窗体
目录 前言: 过程: UI层代码展示: BLL层代码展示: DAL层代码展示: 查询用户效果图: 总结: 前言: 想要对用户进行查询,需要用到控件DataGrideView,通过代码的形式将数据库表中的数据显示在DataGrideview控件中,不用对DatGridView控件…...
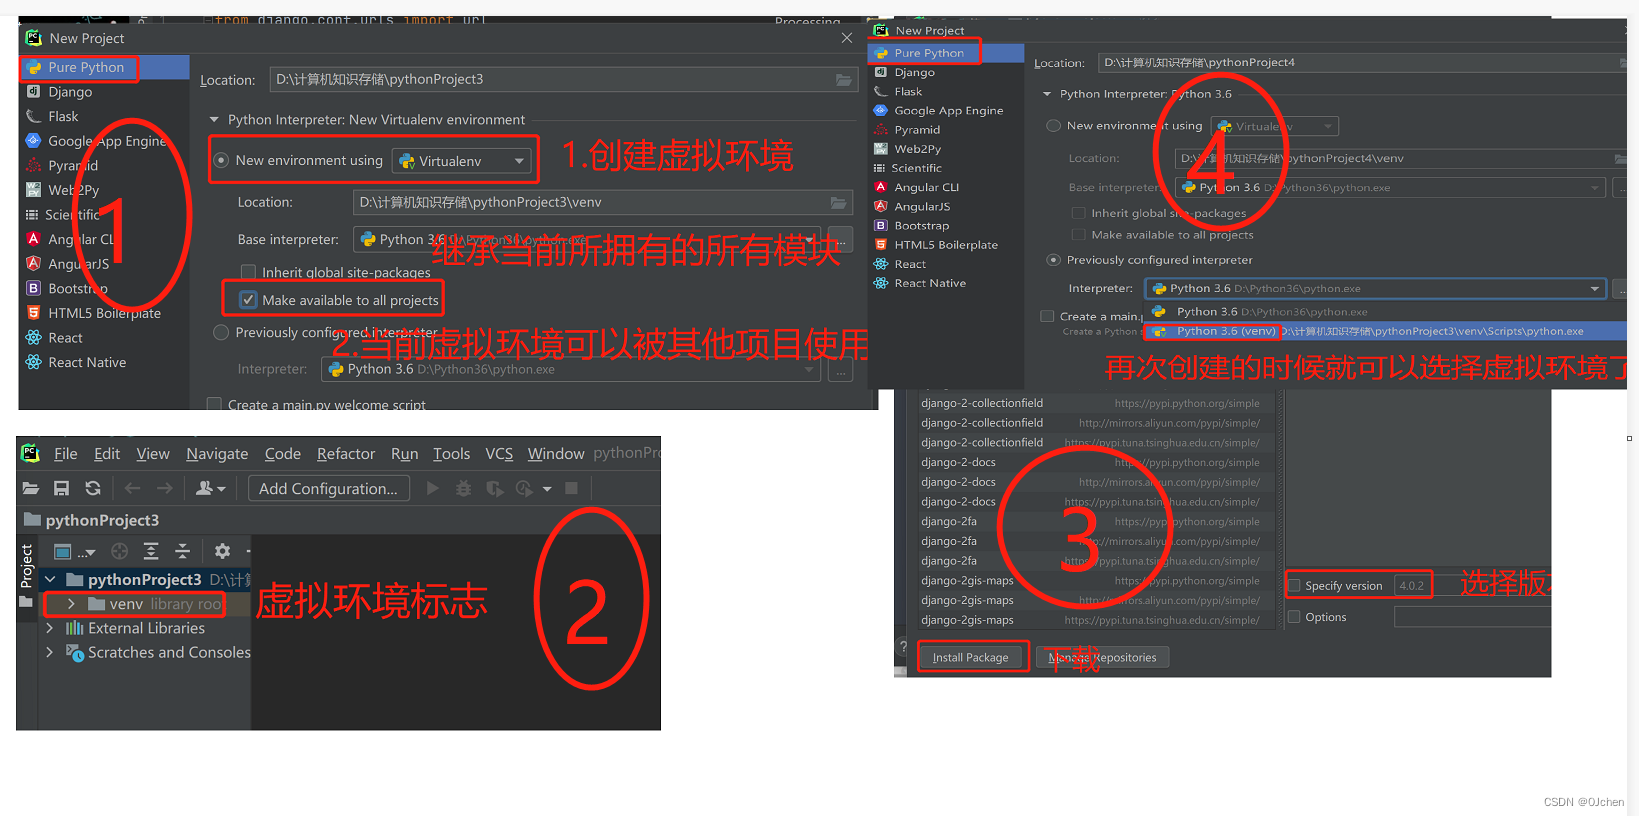
Django之路由层
文章目录 路由匹配语法路由配置注意事项转换器注册自定义转化器 无名分组和有名分组无名分组有名分组 反向解析简介普通反向解析无名分组、有名分组之反向解析 路由分发简介为什么要用路由分发?路由分发实现 伪静态的概念名称空间虚拟环境什么是虚拟环境?…...
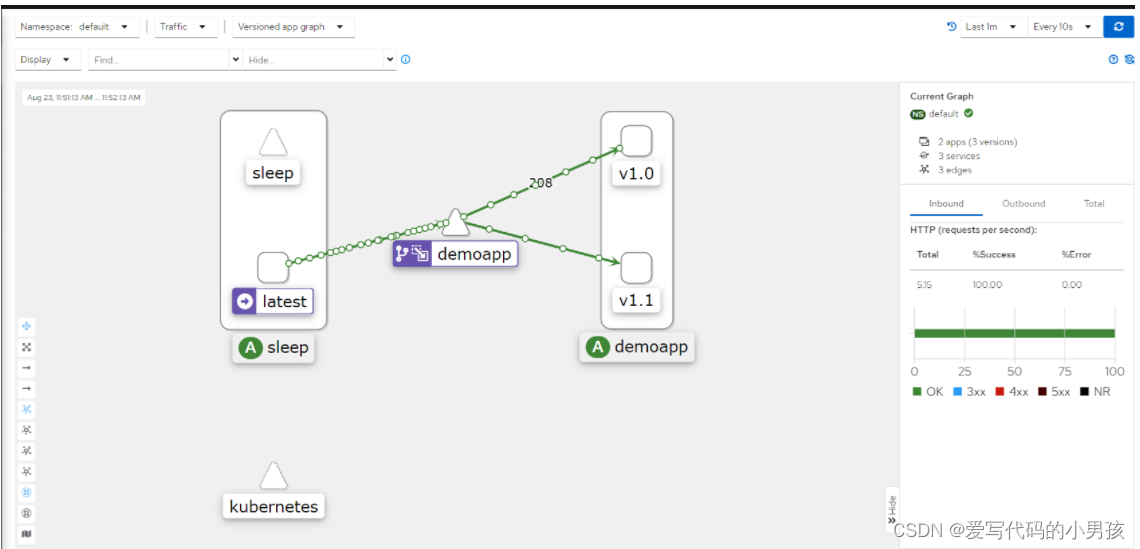
【06】VirtualService高级流量功能
5.3 weight 部署demoapp v10和v11版本 --- apiVersion: apps/v1 kind: Deployment metadata:labels:app: demoappv10version: v1.0name: demoappv10 spec:progressDeadlineSeconds: 600replicas: 3selector:matchLabels:app: demoappversion: v1.0template:metadata:labels:app…...

322. 零钱兑换
给你一个整数数组 coins ,表示不同面额的硬币;以及一个整数 amount ,表示总金额。 计算并返回可以凑成总金额所需的 最少的硬币个数 。如果没有任何一种硬币组合能组成总金额,返回 -1 。 你可以认为每种硬币的数量是无限的。 示…...
两两交换链表中的节点)
力扣HOT100(30)两两交换链表中的节点
链表的交换要注意 “链表不断链”。前驱和后继都要连着迭代法(必学死磕!O (n) 时间,O (1) 空间)1. 为什么必须用虚拟头节点?因为交换后链表的头节点会变! 比如示例 1 中,原来的头是 1࿰…...

基于声卡与电流互感器的安全交流功率测量系统设计与实践
1. 项目概述:用声卡安全测量交流功率我一直对各种测量技术抱有浓厚的兴趣,毕竟“测量即认知”这句老话在今天依然适用。对于电力消耗和产出,没有什么比直接测量更能说明问题了。交流功率的测量,核心在于同时获取电压和电流的瞬时值…...
到panic:深入Linux 5.4内核,看异常处理如何层层递进)
从BUG()到panic:深入Linux 5.4内核,看异常处理如何层层递进
从BUG()到panic:Linux内核异常处理的防御体系全解析当你在深夜调试一个内核模块时,突然屏幕刷出一串红色警告——这可能是每个Linux内核开发者都经历过的噩梦时刻。但你是否想过,从第一行警告出现到系统完全崩溃,内核究竟经历了怎…...

航空航天为什么离不开高强镁合金?国产替代到哪一步了
飞机每减重一千克,全年大约节省四千两百美元的燃油费用——这是航空工程师熟悉的经验值。在商业航空领域,这个数字还只是财务账;在战斗机、导弹和卫星的世界里,减重的收益被换算成更远的航程、更大的载荷、更高的机动性࿰…...

【DeepSeek架构评审功能深度解密】:20年架构师亲授3大避坑指南与5步落地 checklist
更多请点击: https://kaifayun.com 第一章:DeepSeek架构评审功能全景概览 DeepSeek架构评审功能是一套面向大模型系统设计与工程落地的自动化分析框架,聚焦于模型结构合理性、计算图优化潜力、内存访问模式、算子兼容性及部署约束等多维度评…...
)
大佬推荐的网络安全学习路线(从基础到高级,超级详细)
大佬推荐的网络安全学习路线(从基础到高级,超级详细) 说起网络安全,你可能会担心它是一个过时的行业。有人说,网络安全快卷死了,你既要攻又要防,并且随着技术的发展,你还要不断地学…...

基于PIC32的嵌入式MIDI合成器:从波表合成到硬件实现
1. 项目概述:一个基于嵌入式微控制器的MIDI声音合成器如果你对电子音乐制作、嵌入式开发,或者DIY硬件合成器感兴趣,那么“REMI Synth”这个项目绝对值得你花时间深入了解。它本质上是一个数字单音MIDI控制的声音合成器,核心是一块…...

具身智能:面向新兴交叉学科建设的思考与建议 2026
这份由 CCF YOCSEF 长三角五地学术委员会 2026 年 5 月发布的白皮书,聚焦具身智能作为新兴交叉学科的建设,明确其并非 AI 与机器人学的简单拼接,而是围绕物理交互中的智能行为形成的新问题域,提出 “三大基本问题 一个应用需求”…...

全球无障碍宣传日:iOS 26 辅助功能大升级,这些实用小功能你用过吗?
辅助功能发展与升级很多人对辅助功能的印象还停留在 "小白点",但随着 iPhone 进入全面屏时代,它逐渐变得陌生。实际上,Apple 每年都会为其增添功能,方便身体有障人士使用 iPhone。而且,这些功能不仅惠及有障…...

如何快速定制Office界面:终极开源工具使用指南
如何快速定制Office界面:终极开源工具使用指南 【免费下载链接】office-ribbonx-editor An overhauled fork of the original Custom UI Editor for Microsoft Office, built with WPF 项目地址: https://gitcode.com/gh_mirrors/of/office-ribbonx-editor O…...