第二十三章 opengl之高级OpenGL(实例化)
OpenGL
- 实例化
- 实例化数组
- 绘制小行星带
实例化
综合应用。
如果绘制了很多的模型,但是大部分的模型包含同一组顶点数据,只是不同的世界空间变换。
举例:一个全是草的场景,每根草都是一个包含了几个小三角形的模型。需要绘制很多根草,最后每帧需要渲染更多的草。因为:每一根草仅仅是由几个三角形构成,渲染几乎是瞬间完成的,但上千个渲染函数调用却会极大地影响性能。
渲染大量物体时,代码看起来会像这样:
for(unsigned int i = 0; i < amount_of_models_to_draw; i++)
{DoSomePreparations(); // 绑定VAO,绑定纹理,设置uniform等glDrawArrays(GL_TRIANGLES, 0, amount_of_vertices);
}
如果像这样绘制模型的大量实例,会出现因为绘制调用过多而达到性能瓶颈。与绘制顶点本身相比,使用glDrawArrays或glDrawElements函数告诉GPU去绘制你的顶点数据会消耗更多的性能,因为OpenGL在绘制顶点数据之前需要做很多准备工作(比如告诉GPU该从哪个缓冲读取数据,从哪寻找顶点属性,而且这些都是在相对缓慢的CPU到GPU总线(CPU to GPU Bus)上进行的)。所以,即便渲染顶点非常快,命令GPU去渲染却未必。
如果我们能够将数据一次性发送给GPU,然后使用一个绘制函数让OpenGL利用这些数据绘制多个物体,就会更方便了。这就是实例化(Instancing)。实例化这项技术能够让我们使用一个渲染调用来绘制多个物体,来节省每次绘制物体时CPU -> GPU的通信,它只需要一次即可。
如果想使用实例化渲染,我们只需要将glDrawArrays和glDrawElements的渲染调用分别改为glDrawArraysInstanced和glDrawElementsInstanced就可以了。这些渲染函数的实例化版本需要一个额外的参数,叫做实例数量(Instance Count),它能够设置我们需要渲染的实例个数。
这样我们只需要将必须的数据发送到GPU一次,然后使用一次函数调用告诉GPU它应该如何绘制这些实例。GPU将会直接渲染这些实例,而不用不断地与CPU进行通信。
这个函数本身并没有什么用。渲染同一个物体一千次对我们并没有什么用处,每个物体都是完全相同的,而且还在同一个位置。我们只能看见一个物体!处于这个原因,GLSL在顶点着色器中嵌入了另一个内建变量,gl_InstanceID。
在使用实例化渲染调用时,gl_InstanceID会从0开始,在每个实例被渲染时递增1。比如说,我们正在渲染第43个实例,那么顶点着色器中它的gl_InstanceID将会是42。因为每个实例都有唯一的ID,我们可以建立一个数组,将ID与位置值对应起来,将每个实例放置在世界的不同位置。
为了体验一下实例化绘制,我们将会在标准化设备坐标系中使用一个渲染调用,绘制100个2D四边形。我们会索引一个包含100个偏移向量的uniform数组,将偏移值加到每个实例化的四边形上。最终的结果是一个排列整齐的四边形网格:
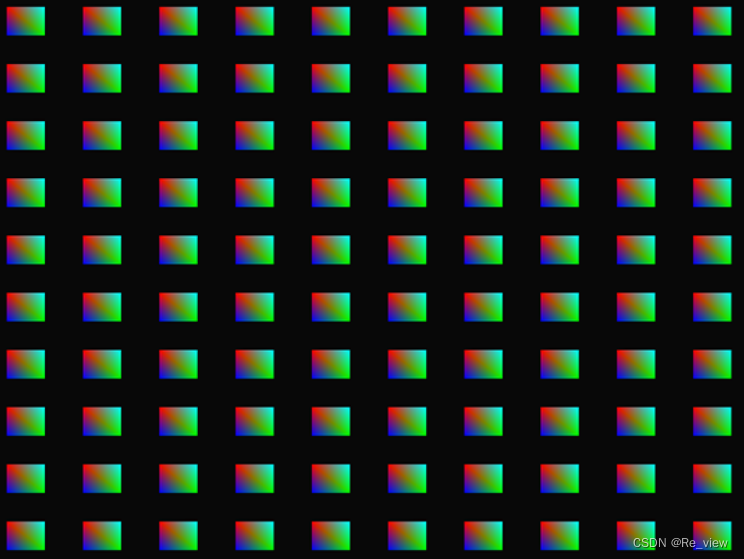
每个四边形由2个三角形所组成,一共有6个顶点。每个顶点包含一个2D的标准化设备坐标位置向量和一个颜色向量。 下面就是这个例子使用的顶点数据,为了大量填充屏幕,每个三角形都很小:
float quadVertices[] = {// 位置          // 颜色-0.05f,  0.05f,  1.0f, 0.0f, 0.0f,0.05f, -0.05f,  0.0f, 1.0f, 0.0f,-0.05f, -0.05f,  0.0f, 0.0f, 1.0f,-0.05f,  0.05f,  1.0f, 0.0f, 0.0f,0.05f, -0.05f,  0.0f, 1.0f, 0.0f,   0.05f,  0.05f,  0.0f, 1.0f, 1.0f
};
片段着色器会从顶点着色器接受颜色向量,并将其设置为它的颜色输出,来实现四边形的颜色:
#version 330 core
out vec4 FragColor;in vec3 fColor;void main()
{FragColor = vec4(fColor, 1.0);
}
而顶点着色器的实现是:
#version 330 core
layout (location = 0) in vec2 aPos;
layout (location = 1) in vec3 aColor;out vec3 fColor;uniform vec2 offsets[100];void main()
{vec2 offset = offsets[gl_InstanceID];gl_Position = vec4(aPos + offset, 0.0, 1.0);fColor = aColor;
}
上述代码定义了一个叫做offsets的数组,它包含100个偏移向量。在顶点着色器中,我们会使用gl_InstanceID来索引offsets数组,获取每个实例的偏移向量。如果我们要实例化绘制100个四边形,仅使用这个顶点着色器我们就能得到100个位于不同位置的四边形。
需要设置这些偏移位置,在进入渲染循环之前使用一个嵌套for循环计算:
glm::vec2 translations[100];
int index = 0;
float offset = 0.1f;
for(int y = -10; y < 10; y += 2)
{for(int x = -10; x < 10; x += 2){glm::vec2 translation;translation.x = (float)x / 10.0f + offset;translation.y = (float)y / 10.0f + offset;translations[index++] = translation;}
}
创建100个位移向量,表示10x10网格上的所有位置。除了生成translations数组之外,我们还需要将数据转移到顶点着色器的uniform数组中:
shader.use();
for(unsigned int i = 0; i < 100; i++)
{stringstream ss;string index;ss << i; index = ss.str(); shader.setVec2(("offsets[" + index + "]").c_str(), translations[i]);
}
我们将for循环的计数器i转换为一个string,我们可以用它来动态创建位置值的字符串,用于uniform位置值的索引。接下来,我们会对offsets uniform数组中的每一项设置对应的位移向量。
现在所有的准备工作都做完了,我们可以开始渲染四边形了。对于实例化渲染,我们使用glDrawArraysInstanced或glDrawElementsInstanced。因为我们使用的不是索引缓冲,我们会调用glDrawArrays版本的函数:
glBindVertexArray(quadVAO);
glDrawArraysInstanced(GL_TRIANGLES, 0, 6, 100);
glDrawArraysInstanced的参数和glDrawArrays完全一样,除了最后多了个参数用来设置需要绘制的实例数量。因为我们想要在10x10网格中显示100个四边形,我们将它设置为100.运行代码之后,得到100个五彩的四边形。
实例化数组
如果我们要渲染远超过100个实例的时候(这其实非常普遍),我们最终会超过最大能够发送至着色器的uniform数据大小上限。它的一个代替方案是实例化数组(Instanced Array),它被定义为一个顶点属性(能够让我们储存更多的数据),仅在顶点着色器渲染一个新的实例时才会更新。
使用顶点属性时,顶点着色器的每次运行都会让GLSL获取新一组适用于当前顶点的属性。而当我们将顶点属性定义为一个实例化数组时,顶点着色器就只需要对每个实例,而不是每个顶点,更新顶点属性的内容了。这允许我们对逐顶点的数据使用普通的顶点属性,而对逐实例的数据使用实例化数组。
使用之前的例子,并将偏移量uniform数组设置为一个实例化数组。我们需要在顶点着色器中再添加一个顶点属性:
#version 330 core
layout (location = 0) in vec2 aPos;
layout (location = 1) in vec3 aColor;
layout (location = 2) in vec2 aOffset;out vec3 fColor;void main()
{gl_Position = vec4(aPos + aOffset, 0.0, 1.0);fColor = aColor;
}
不再使用gl_InstanceID,现在不需要索引一个uniform数组就能够直接使用offset属性了。
因为实例化数组和position与color变量一样,都是顶点属性,我们还需要将它的内容存在顶点缓冲对象中,并且配置它的属性指针。我们首先将(上一部分的)translations数组存到一个新的缓冲对象中:
unsigned int instanceVBO;
glGenBuffers(1, &instanceVBO);
glBindBuffer(GL_ARRAY_BUFFER, instanceVBO);
glBufferData(GL_ARRAY_BUFFER, sizeof(glm::vec2) * 100, &translations[0], GL_STATIC_DRAW);
glBindBuffer(GL_ARRAY_BUFFER, 0);
之后我们还需要设置它的顶点属性指针,并启用顶点属性:
glEnableVertexAttribArray(2);
glBindBuffer(GL_ARRAY_BUFFER, instanceVBO);
glVertexAttribPointer(2, 2, GL_FLOAT, GL_FALSE, 2 * sizeof(float), (void*)0);
glBindBuffer(GL_ARRAY_BUFFER, 0);
glVertexAttribDivisor(2, 1);
最后一行,我们调用了glVertexAttribDivisor。这个函数告诉了OpenGL该什么时候更新顶点属性的内容至新一组数据。它的第一个参数是需要的顶点属性,第二个参数是属性除数(Attribute Divisor)。默认情况下,属性除数是0,告诉OpenGL我们需要在顶点着色器的每次迭代时更新顶点属性。将它设置为1时,我们告诉OpenGL我们希望在渲染一个新实例的时候更新顶点属性。而设置为2时,我们希望每2个实例更新一次属性,以此类推。我们将属性除数设置为1,是在告诉OpenGL,处于位置值2的顶点属性是一个实例化数组。这次是使用实例化数组实现的,这让我们能够传递更多的数据到顶点着色器(只要内存允许)来用于实例化绘制。
还可以使用gl_InstanceID,从右上到左下逐渐缩小四边形:
void main()
{vec2 pos = aPos * (gl_InstanceID / 100.0);gl_Position = vec4(pos + aOffset, 0.0, 1.0);fColor = aColor;
}
结果是:绘制的第一个四边形的实例会非常小,随着绘制实例的增加,而gl_InstanceID会越来越接近100,则四边形也就越来越接近原始大小。
上述源码综合如下:
#include <glad/glad.h>
#include <GLFW/glfw3.h>#include <demo/shader.h>#include <iostream>void framebuffer_size_callback(GLFWwindow* window, int width, int height);// settings
const unsigned int SCR_WIDTH = 800;
const unsigned int SCR_HEIGHT = 600;int main()
{// glfw: initialize and configure// ------------------------------glfwInit();glfwWindowHint(GLFW_CONTEXT_VERSION_MAJOR, 3);glfwWindowHint(GLFW_CONTEXT_VERSION_MINOR, 3);glfwWindowHint(GLFW_OPENGL_PROFILE, GLFW_OPENGL_CORE_PROFILE);#ifdef __APPLE__glfwWindowHint(GLFW_OPENGL_FORWARD_COMPAT, GL_TRUE);
#endif// glfw window creation// --------------------GLFWwindow* window = glfwCreateWindow(SCR_WIDTH, SCR_HEIGHT, "LearnOpenGL", NULL, NULL);if (window == NULL){std::cout << "Failed to create GLFW window" << std::endl;glfwTerminate();return -1;}glfwMakeContextCurrent(window);// glad: load all OpenGL function pointers// ---------------------------------------if (!gladLoadGLLoader((GLADloadproc)glfwGetProcAddress)){std::cout << "Failed to initialize GLAD" << std::endl;return -1;}// configure global opengl state// -----------------------------glEnable(GL_DEPTH_TEST);// build and compile shaders// -------------------------Shader shader("10.1.instancing.vs", "10.1.instancing.fs");// generate a list of 100 quad locations/translation-vectors// ---------------------------------------------------------glm::vec2 translations[100];int index = 0;float offset = 0.1f;for (int y = -10; y < 10; y += 2){for (int x = -10; x < 10; x += 2){glm::vec2 translation;translation.x = (float)x / 10.0f + offset;translation.y = (float)y / 10.0f + offset;translations[index++] = translation;}}// store instance data in an array buffer// --------------------------------------unsigned int instanceVBO;glGenBuffers(1, &instanceVBO);glBindBuffer(GL_ARRAY_BUFFER, instanceVBO);glBufferData(GL_ARRAY_BUFFER, sizeof(glm::vec2) * 100, &translations[0], GL_STATIC_DRAW);glBindBuffer(GL_ARRAY_BUFFER, 0);// set up vertex data (and buffer(s)) and configure vertex attributes// ------------------------------------------------------------------float quadVertices[] = {// positions     // colors-0.05f,  0.05f,  1.0f, 0.0f, 0.0f,0.05f, -0.05f,  0.0f, 1.0f, 0.0f,-0.05f, -0.05f,  0.0f, 0.0f, 1.0f,-0.05f,  0.05f,  1.0f, 0.0f, 0.0f,0.05f, -0.05f,  0.0f, 1.0f, 0.0f,0.05f,  0.05f,  0.0f, 1.0f, 1.0f};unsigned int quadVAO, quadVBO;glGenVertexArrays(1, &quadVAO);glGenBuffers(1, &quadVBO);glBindVertexArray(quadVAO);glBindBuffer(GL_ARRAY_BUFFER, quadVBO);glBufferData(GL_ARRAY_BUFFER, sizeof(quadVertices), quadVertices, GL_STATIC_DRAW);glEnableVertexAttribArray(0);glVertexAttribPointer(0, 2, GL_FLOAT, GL_FALSE, 5 * sizeof(float), (void*)0);glEnableVertexAttribArray(1);glVertexAttribPointer(1, 3, GL_FLOAT, GL_FALSE, 5 * sizeof(float), (void*)(2 * sizeof(float)));// also set instance dataglEnableVertexAttribArray(2);glBindBuffer(GL_ARRAY_BUFFER, instanceVBO); // this attribute comes from a different vertex bufferglVertexAttribPointer(2, 2, GL_FLOAT, GL_FALSE, 2 * sizeof(float), (void*)0);glBindBuffer(GL_ARRAY_BUFFER, 0);glVertexAttribDivisor(2, 1); // tell OpenGL this is an instanced vertex attribute.// render loop// -----------while (!glfwWindowShouldClose(window)){// render// ------glClearColor(0.1f, 0.1f, 0.1f, 1.0f);glClear(GL_COLOR_BUFFER_BIT | GL_DEPTH_BUFFER_BIT);// draw 100 instanced quadsshader.use();glBindVertexArray(quadVAO);glDrawArraysInstanced(GL_TRIANGLES, 0, 6, 100); // 100 triangles of 6 vertices eachglBindVertexArray(0);// glfw: swap buffers and poll IO events (keys pressed/released, mouse moved etc.)// -------------------------------------------------------------------------------glfwSwapBuffers(window);glfwPollEvents();}// optional: de-allocate all resources once they've outlived their purpose:// ------------------------------------------------------------------------glDeleteVertexArrays(1, &quadVAO);glDeleteBuffers(1, &quadVBO);glfwTerminate();return 0;
}// glfw: whenever the window size changed (by OS or user resize) this callback function executes
// ---------------------------------------------------------------------------------------------
void framebuffer_size_callback(GLFWwindow* window, int width, int height)
{// make sure the viewport matches the new window dimensions; note that width and // height will be significantly larger than specified on retina displays.glViewport(0, 0, width, height);
}
#include <demo/shader.h>如下:
#ifndef SHADER_H
#define SHADER_H#include <glad/glad.h>
#include <glm/glm.hpp>#include <string>
#include <fstream>
#include <sstream>
#include <iostream>class Shader
{
public:unsigned int ID;// constructor generates the shader on the fly// ------------------------------------------------------------------------Shader(const char* vertexPath, const char* fragmentPath, const char* geometryPath = nullptr){// 1. retrieve the vertex/fragment source code from filePathstd::string vertexCode;std::string fragmentCode;std::string geometryCode;std::ifstream vShaderFile;std::ifstream fShaderFile;std::ifstream gShaderFile;// ensure ifstream objects can throw exceptions:vShaderFile.exceptions (std::ifstream::failbit | std::ifstream::badbit);fShaderFile.exceptions (std::ifstream::failbit | std::ifstream::badbit);gShaderFile.exceptions (std::ifstream::failbit | std::ifstream::badbit);try {// open filesvShaderFile.open(vertexPath);fShaderFile.open(fragmentPath);std::stringstream vShaderStream, fShaderStream;// read file's buffer contents into streamsvShaderStream << vShaderFile.rdbuf();fShaderStream << fShaderFile.rdbuf();		// close file handlersvShaderFile.close();fShaderFile.close();// convert stream into stringvertexCode = vShaderStream.str();fragmentCode = fShaderStream.str();			// if geometry shader path is present, also load a geometry shaderif(geometryPath != nullptr){gShaderFile.open(geometryPath);std::stringstream gShaderStream;gShaderStream << gShaderFile.rdbuf();gShaderFile.close();geometryCode = gShaderStream.str();}}catch (std::ifstream::failure& e){std::cout << "ERROR::SHADER::FILE_NOT_SUCCESSFULLY_READ: " << e.what() << std::endl;}const char* vShaderCode = vertexCode.c_str();const char * fShaderCode = fragmentCode.c_str();// 2. compile shadersunsigned int vertex, fragment;// vertex shadervertex = glCreateShader(GL_VERTEX_SHADER);glShaderSource(vertex, 1, &vShaderCode, NULL);glCompileShader(vertex);checkCompileErrors(vertex, "VERTEX");// fragment Shaderfragment = glCreateShader(GL_FRAGMENT_SHADER);glShaderSource(fragment, 1, &fShaderCode, NULL);glCompileShader(fragment);checkCompileErrors(fragment, "FRAGMENT");// if geometry shader is given, compile geometry shaderunsigned int geometry;if(geometryPath != nullptr){const char * gShaderCode = geometryCode.c_str();geometry = glCreateShader(GL_GEOMETRY_SHADER);glShaderSource(geometry, 1, &gShaderCode, NULL);glCompileShader(geometry);checkCompileErrors(geometry, "GEOMETRY");}// shader ProgramID = glCreateProgram();glAttachShader(ID, vertex);glAttachShader(ID, fragment);if(geometryPath != nullptr)glAttachShader(ID, geometry);glLinkProgram(ID);checkCompileErrors(ID, "PROGRAM");// delete the shaders as they're linked into our program now and no longer necessaryglDeleteShader(vertex);glDeleteShader(fragment);if(geometryPath != nullptr)glDeleteShader(geometry);}// activate the shader// ------------------------------------------------------------------------void use() { glUseProgram(ID); }// utility uniform functions// ------------------------------------------------------------------------void setBool(const std::string &name, bool value) const{         glUniform1i(glGetUniformLocation(ID, name.c_str()), (int)value); }// ------------------------------------------------------------------------void setInt(const std::string &name, int value) const{ glUniform1i(glGetUniformLocation(ID, name.c_str()), value); }// ------------------------------------------------------------------------void setFloat(const std::string &name, float value) const{ glUniform1f(glGetUniformLocation(ID, name.c_str()), value); }// ------------------------------------------------------------------------void setVec2(const std::string &name, const glm::vec2 &value) const{ glUniform2fv(glGetUniformLocation(ID, name.c_str()), 1, &value[0]); }void setVec2(const std::string &name, float x, float y) const{ glUniform2f(glGetUniformLocation(ID, name.c_str()), x, y); }// ------------------------------------------------------------------------void setVec3(const std::string &name, const glm::vec3 &value) const{ glUniform3fv(glGetUniformLocation(ID, name.c_str()), 1, &value[0]); }void setVec3(const std::string &name, float x, float y, float z) const{ glUniform3f(glGetUniformLocation(ID, name.c_str()), x, y, z); }// ------------------------------------------------------------------------void setVec4(const std::string &name, const glm::vec4 &value) const{ glUniform4fv(glGetUniformLocation(ID, name.c_str()), 1, &value[0]); }void setVec4(const std::string &name, float x, float y, float z, float w) { glUniform4f(glGetUniformLocation(ID, name.c_str()), x, y, z, w); }// ------------------------------------------------------------------------void setMat2(const std::string &name, const glm::mat2 &mat) const{glUniformMatrix2fv(glGetUniformLocation(ID, name.c_str()), 1, GL_FALSE, &mat[0][0]);}// ------------------------------------------------------------------------void setMat3(const std::string &name, const glm::mat3 &mat) const{glUniformMatrix3fv(glGetUniformLocation(ID, name.c_str()), 1, GL_FALSE, &mat[0][0]);}// ------------------------------------------------------------------------void setMat4(const std::string &name, const glm::mat4 &mat) const{glUniformMatrix4fv(glGetUniformLocation(ID, name.c_str()), 1, GL_FALSE, &mat[0][0]);}private:// utility function for checking shader compilation/linking errors.// ------------------------------------------------------------------------void checkCompileErrors(GLuint shader, std::string type){GLint success;GLchar infoLog[1024];if(type != "PROGRAM"){glGetShaderiv(shader, GL_COMPILE_STATUS, &success);if(!success){glGetShaderInfoLog(shader, 1024, NULL, infoLog);std::cout << "ERROR::SHADER_COMPILATION_ERROR of type: " << type << "\n" << infoLog << "\n -- --------------------------------------------------- -- " << std::endl;}}else{glGetProgramiv(shader, GL_LINK_STATUS, &success);if(!success){glGetProgramInfoLog(shader, 1024, NULL, infoLog);std::cout << "ERROR::PROGRAM_LINKING_ERROR of type: " << type << "\n" << infoLog << "\n -- --------------------------------------------------- -- " << std::endl;}}}
};
#endif
绘制小行星带
实例化渲染适合用来制作这种:所有小行星都可以使用一个模型标识,每个小行星可以再使用不同的变换矩阵来进行少许的变化。
首先不使用实例化渲染,模拟小行星绕着行行飞行的场景。这个场景会包含一个大的行星模型,和小行星的岩石模型。再用模型加载器来加载模型。
为了最终的效果,可以为每个小行星生成一个变换矩阵,用作它们的模型矩阵。变换矩阵首先将小行星位移到小行星带中的某处,还需要加上一个小的随机偏移值到这个偏移量上,让圆环更加自然。接着,应用一个随机缩放,并以一个旋转向量为轴进行一个随机旋转。最终的变换矩阵不仅能将小行星变换到行星的周围,还能看着更自然。每一个小行星都与众不同。
unsigned int amount = 1000;
glm::mat4 *modelMatrices;
modelMatrices = new glm::mat4[amount];
srand(glfwGetTime()); // 初始化随机种子
float radius = 50.0;
float offset = 2.5f;
for(unsigned int i = 0; i < amount; i++)
{glm::mat4 model;// 1. 位移:分布在半径为 'radius' 的圆形上,偏移的范围是 [-offset, offset]float angle = (float)i / (float)amount * 360.0f;float displacement = (rand() % (int)(2 * offset * 100)) / 100.0f - offset;float x = sin(angle) * radius + displacement;displacement = (rand() % (int)(2 * offset * 100)) / 100.0f - offset;float y = displacement * 0.4f; // 让行星带的高度比x和z的宽度要小displacement = (rand() % (int)(2 * offset * 100)) / 100.0f - offset;float z = cos(angle) * radius + displacement;model = glm::translate(model, glm::vec3(x, y, z));// 2. 缩放:在 0.05 和 0.25f 之间缩放float scale = (rand() % 20) / 100.0f + 0.05;model = glm::scale(model, glm::vec3(scale));// 3. 旋转:绕着一个(半)随机选择的旋转轴向量进行随机的旋转float rotAngle = (rand() % 360);model = glm::rotate(model, rotAngle, glm::vec3(0.4f, 0.6f, 0.8f));// 4. 添加到矩阵的数组中modelMatrices[i] = model;
}
上述代码我们只是将小行星的x和z位置变换到了一个半径为radius的圆形上,并且在半径的基础上偏移了-offset到offset。我们让y偏移的影响更小一点,让小行星带更扁平一点。接下来,我们应用了缩放和旋转变换,并将最终的变换矩阵储存在modelMatrices中,这个数组的大小是amount。这里,我们一共生成1000个模型矩阵,每个小行星一个。
在加载完行星和岩石模型,并编译完着色器之后,渲染的代码看起来是这样的:
// 绘制行星
shader.use();
glm::mat4 model;
model = glm::translate(model, glm::vec3(0.0f, -3.0f, 0.0f));
model = glm::scale(model, glm::vec3(4.0f, 4.0f, 4.0f));
shader.setMat4("model", model);
planet.Draw(shader);// 绘制小行星
for(unsigned int i = 0; i < amount; i++)
{shader.setMat4("model", modelMatrices[i]);rock.Draw(shader);
}
上述代码,首先绘制了行星的模型,并对它进行位移和缩放,下面绘制amount数量的岩石模型。在绘制每个岩石之前,首先需要在着色器内设置对应的模型变换矩阵。
这个场景每帧包含1001次渲染调用,其中1000个是岩石模型:
#include <glad/glad.h>
#include <GLFW/glfw3.h>
#include <stb_image.h>#include <glm/glm.hpp>
#include <glm/gtc/matrix_transform.hpp>
#include <glm/gtc/type_ptr.hpp>#include <learnopengl/shader.h>
#include <learnopengl/camera.h>
#include <learnopengl/model.h>#include <iostream>void framebuffer_size_callback(GLFWwindow* window, int width, int height);
void mouse_callback(GLFWwindow* window, double xpos, double ypos);
void scroll_callback(GLFWwindow* window, double xoffset, double yoffset);
void processInput(GLFWwindow *window);// settings
const unsigned int SCR_WIDTH = 800;
const unsigned int SCR_HEIGHT = 600;// camera
Camera camera(glm::vec3(0.0f, 0.0f, 55.0f));
float lastX = (float)SCR_WIDTH / 2.0;
float lastY = (float)SCR_HEIGHT / 2.0;
bool firstMouse = true;// timing
float deltaTime = 0.0f;
float lastFrame = 0.0f;int main()
{// glfw: initialize and configure// ------------------------------glfwInit();glfwWindowHint(GLFW_CONTEXT_VERSION_MAJOR, 3);glfwWindowHint(GLFW_CONTEXT_VERSION_MINOR, 3);glfwWindowHint(GLFW_OPENGL_PROFILE, GLFW_OPENGL_CORE_PROFILE);#ifdef __APPLE__glfwWindowHint(GLFW_OPENGL_FORWARD_COMPAT, GL_TRUE);
#endif// glfw window creation// --------------------GLFWwindow* window = glfwCreateWindow(SCR_WIDTH, SCR_HEIGHT, "LearnOpenGL", NULL, NULL);if (window == NULL){std::cout << "Failed to create GLFW window" << std::endl;glfwTerminate();return -1;}glfwMakeContextCurrent(window);glfwSetFramebufferSizeCallback(window, framebuffer_size_callback);glfwSetCursorPosCallback(window, mouse_callback);glfwSetScrollCallback(window, scroll_callback);// tell GLFW to capture our mouseglfwSetInputMode(window, GLFW_CURSOR, GLFW_CURSOR_DISABLED);// glad: load all OpenGL function pointers// ---------------------------------------if (!gladLoadGLLoader((GLADloadproc)glfwGetProcAddress)){std::cout << "Failed to initialize GLAD" << std::endl;return -1;}// configure global opengl state// -----------------------------glEnable(GL_DEPTH_TEST);// build and compile shaders// -------------------------Shader shader("10.2.instancing.vs", "10.2.instancing.fs");// load models// -----------Model rock(FileSystem::getPath("resources/objects/rock/rock.obj"));Model planet(FileSystem::getPath("resources/objects/planet/planet.obj"));// generate a large list of semi-random model transformation matrices// ------------------------------------------------------------------unsigned int amount = 1000;glm::mat4* modelMatrices;modelMatrices = new glm::mat4[amount];srand(static_cast<unsigned int>(glfwGetTime())); // initialize random seedfloat radius = 50.0;float offset = 2.5f;for (unsigned int i = 0; i < amount; i++){glm::mat4 model = glm::mat4(1.0f);// 1. translation: displace along circle with 'radius' in range [-offset, offset]float angle = (float)i / (float)amount * 360.0f;float displacement = (rand() % (int)(2 * offset * 100)) / 100.0f - offset;float x = sin(angle) * radius + displacement;displacement = (rand() % (int)(2 * offset * 100)) / 100.0f - offset;float y = displacement * 0.4f; // keep height of asteroid field smaller compared to width of x and zdisplacement = (rand() % (int)(2 * offset * 100)) / 100.0f - offset;float z = cos(angle) * radius + displacement;model = glm::translate(model, glm::vec3(x, y, z));// 2. scale: Scale between 0.05 and 0.25ffloat scale = static_cast<float>((rand() % 20) / 100.0 + 0.05);model = glm::scale(model, glm::vec3(scale));// 3. rotation: add random rotation around a (semi)randomly picked rotation axis vectorfloat rotAngle = static_cast<float>((rand() % 360));model = glm::rotate(model, rotAngle, glm::vec3(0.4f, 0.6f, 0.8f));// 4. now add to list of matricesmodelMatrices[i] = model;}// render loop// -----------while (!glfwWindowShouldClose(window)){// per-frame time logic// --------------------float currentFrame = static_cast<float>(glfwGetTime());deltaTime = currentFrame - lastFrame;lastFrame = currentFrame;// input// -----processInput(window);// render// ------glClearColor(0.1f, 0.1f, 0.1f, 1.0f);glClear(GL_COLOR_BUFFER_BIT | GL_DEPTH_BUFFER_BIT);// configure transformation matricesglm::mat4 projection = glm::perspective(glm::radians(45.0f), (float)SCR_WIDTH / (float)SCR_HEIGHT, 0.1f, 1000.0f);glm::mat4 view = camera.GetViewMatrix();;shader.use();shader.setMat4("projection", projection);shader.setMat4("view", view);// draw planetglm::mat4 model = glm::mat4(1.0f);model = glm::translate(model, glm::vec3(0.0f, -3.0f, 0.0f));model = glm::scale(model, glm::vec3(4.0f, 4.0f, 4.0f));shader.setMat4("model", model);planet.Draw(shader);// draw meteoritesfor (unsigned int i = 0; i < amount; i++){shader.setMat4("model", modelMatrices[i]);rock.Draw(shader);}     // glfw: swap buffers and poll IO events (keys pressed/released, mouse moved etc.)// -------------------------------------------------------------------------------glfwSwapBuffers(window);glfwPollEvents();}glfwTerminate();return 0;
}// process all input: query GLFW whether relevant keys are pressed/released this frame and react accordingly
// ---------------------------------------------------------------------------------------------------------
void processInput(GLFWwindow *window)
{if (glfwGetKey(window, GLFW_KEY_ESCAPE) == GLFW_PRESS)glfwSetWindowShouldClose(window, true);if (glfwGetKey(window, GLFW_KEY_W) == GLFW_PRESS)camera.ProcessKeyboard(FORWARD, deltaTime);if (glfwGetKey(window, GLFW_KEY_S) == GLFW_PRESS)camera.ProcessKeyboard(BACKWARD, deltaTime);if (glfwGetKey(window, GLFW_KEY_A) == GLFW_PRESS)camera.ProcessKeyboard(LEFT, deltaTime);if (glfwGetKey(window, GLFW_KEY_D) == GLFW_PRESS)camera.ProcessKeyboard(RIGHT, deltaTime);
}// glfw: whenever the window size changed (by OS or user resize) this callback function executes
// ---------------------------------------------------------------------------------------------
void framebuffer_size_callback(GLFWwindow* window, int width, int height)
{// make sure the viewport matches the new window dimensions; note that width and // height will be significantly larger than specified on retina displays.glViewport(0, 0, width, height);
}// glfw: whenever the mouse moves, this callback is called
// -------------------------------------------------------
void mouse_callback(GLFWwindow* window, double xposIn, double yposIn)
{float xpos = static_cast<float>(xposIn);float ypos = static_cast<float>(yposIn);if (firstMouse){lastX = xpos;lastY = ypos;firstMouse = false;}float xoffset = xpos - lastX;float yoffset = lastY - ypos; // reversed since y-coordinates go from bottom to toplastX = xpos;lastY = ypos;camera.ProcessMouseMovement(xoffset, yoffset);
}// glfw: whenever the mouse scroll wheel scrolls, this callback is called
// ----------------------------------------------------------------------
void scroll_callback(GLFWwindow* window, double xoffset, double yoffset)
{camera.ProcessMouseScroll(static_cast<float>(yoffset));
}
当增加模型数量时,场景首先不能够流畅运行,帧数下降的很厉害。如果把amount设置成2000,则场景会慢到移动都很困难的程度。
现在使用实例化渲染相同的场景。首先对顶点着色器进行修改:
#version 330 core
layout (location = 0) in vec3 aPos;
layout (location = 2) in vec2 aTexCoords;
layout (location = 3) in mat4 instanceMatrix;out vec2 TexCoords;uniform mat4 projection;
uniform mat4 view;void main()
{gl_Position = projection * view * instanceMatrix * vec4(aPos, 1.0); TexCoords = aTexCoords;
}
不再使用模型uniform变量,改为一个mat4的顶点属性,让我们能够存储一个实例化数组的变换矩阵。然而,当我们顶点属性的类型大于vec4时,就要多进行一步处理了。顶点属性最大允许的数据大小等于一个vec4。因为一个mat4本质上是4个vec4,我们需要为这个矩阵预留4个顶点属性。因为我们将它的位置值设置为3,矩阵每一列的顶点属性位置值就是3、4、5和6。
下面,需要为这四个顶点属性设置属性指针,并将它们设置为实例化数组:
// 顶点缓冲对象
unsigned int buffer;
glGenBuffers(1, &buffer);
glBindBuffer(GL_ARRAY_BUFFER, buffer);
glBufferData(GL_ARRAY_BUFFER, amount * sizeof(glm::mat4), &modelMatrices[0], GL_STATIC_DRAW);for(unsigned int i = 0; i < rock.meshes.size(); i++)
{unsigned int VAO = rock.meshes[i].VAO;glBindVertexArray(VAO);// 顶点属性GLsizei vec4Size = sizeof(glm::vec4);glEnableVertexAttribArray(3); glVertexAttribPointer(3, 4, GL_FLOAT, GL_FALSE, 4 * vec4Size, (void*)0);glEnableVertexAttribArray(4); glVertexAttribPointer(4, 4, GL_FLOAT, GL_FALSE, 4 * vec4Size, (void*)(vec4Size));glEnableVertexAttribArray(5); glVertexAttribPointer(5, 4, GL_FLOAT, GL_FALSE, 4 * vec4Size, (void*)(2 * vec4Size));glEnableVertexAttribArray(6); glVertexAttribPointer(6, 4, GL_FLOAT, GL_FALSE, 4 * vec4Size, (void*)(3 * vec4Size));glVertexAttribDivisor(3, 1);glVertexAttribDivisor(4, 1);glVertexAttribDivisor(5, 1);glVertexAttribDivisor(6, 1);glBindVertexArray(0);
}
这里我们将Mesh的VAO从私有变量改为了公有变量,让我们能够访问它的顶点数组对象。这并不是最好的解决方案,只是为了配合本小节的一个简单的改动。除此之外代码就应该很清楚了。我们告诉了OpenGL应该如何解释每个缓冲顶点属性的缓冲,并且告诉它这些顶点属性是实例化数组。
接下来,我们再次使用网格的VAO,这一次使用glDrawElementsInstanced进行绘制:
// 绘制小行星
instanceShader.use();
for(unsigned int i = 0; i < rock.meshes.size(); i++)
{glBindVertexArray(rock.meshes[i].VAO);glDrawElementsInstanced(GL_TRIANGLES, rock.meshes[i].indices.size(), GL_UNSIGNED_INT, 0, amount);
}
没有实例化渲染的时候,我们只能流畅渲染1000到1500个小行星。而使用了实例化渲染之后,我们可以将这个值设置为100000,每个岩石模型有576个顶点,每帧加起来大概要绘制5700万个顶点,但性能却没有受到任何影响
基本上只要场景中有很多重复的形状,都能够使用实例化渲染来提高性能。
#include <glad/glad.h>
#include <GLFW/glfw3.h>
#include <stb_image.h>#include <glm/glm.hpp>
#include <glm/gtc/matrix_transform.hpp>
#include <glm/gtc/type_ptr.hpp>#include <learnopengl/shader.h>
#include <learnopengl/camera.h>
#include <learnopengl/model.h>#include <iostream>void framebuffer_size_callback(GLFWwindow* window, int width, int height);
void mouse_callback(GLFWwindow* window, double xpos, double ypos);
void scroll_callback(GLFWwindow* window, double xoffset, double yoffset);
void processInput(GLFWwindow *window);// settings
const unsigned int SCR_WIDTH = 800;
const unsigned int SCR_HEIGHT = 600;// camera
Camera camera(glm::vec3(0.0f, 0.0f, 155.0f));
float lastX = (float)SCR_WIDTH / 2.0;
float lastY = (float)SCR_HEIGHT / 2.0;
bool firstMouse = true;// timing
float deltaTime = 0.0f;
float lastFrame = 0.0f;int main()
{// glfw: initialize and configure// ------------------------------glfwInit();glfwWindowHint(GLFW_CONTEXT_VERSION_MAJOR, 3);glfwWindowHint(GLFW_CONTEXT_VERSION_MINOR, 3);glfwWindowHint(GLFW_OPENGL_PROFILE, GLFW_OPENGL_CORE_PROFILE);#ifdef __APPLE__glfwWindowHint(GLFW_OPENGL_FORWARD_COMPAT, GL_TRUE);
#endif// glfw window creation// --------------------GLFWwindow* window = glfwCreateWindow(SCR_WIDTH, SCR_HEIGHT, "LearnOpenGL", NULL, NULL);if (window == NULL){std::cout << "Failed to create GLFW window" << std::endl;glfwTerminate();return -1;}glfwMakeContextCurrent(window);glfwSetFramebufferSizeCallback(window, framebuffer_size_callback);glfwSetCursorPosCallback(window, mouse_callback);glfwSetScrollCallback(window, scroll_callback);// tell GLFW to capture our mouseglfwSetInputMode(window, GLFW_CURSOR, GLFW_CURSOR_DISABLED);// glad: load all OpenGL function pointers// ---------------------------------------if (!gladLoadGLLoader((GLADloadproc)glfwGetProcAddress)){std::cout << "Failed to initialize GLAD" << std::endl;return -1;}// configure global opengl state// -----------------------------glEnable(GL_DEPTH_TEST);// build and compile shaders// -------------------------Shader asteroidShader("10.3.asteroids.vs", "10.3.asteroids.fs");Shader planetShader("10.3.planet.vs", "10.3.planet.fs");// load models// -----------Model rock(FileSystem::getPath("resources/objects/rock/rock.obj"));Model planet(FileSystem::getPath("resources/objects/planet/planet.obj"));// generate a large list of semi-random model transformation matrices// ------------------------------------------------------------------unsigned int amount = 100000;glm::mat4* modelMatrices;modelMatrices = new glm::mat4[amount];srand(static_cast<unsigned int>(glfwGetTime())); // initialize random seedfloat radius = 150.0;float offset = 25.0f;for (unsigned int i = 0; i < amount; i++){glm::mat4 model = glm::mat4(1.0f);// 1. translation: displace along circle with 'radius' in range [-offset, offset]float angle = (float)i / (float)amount * 360.0f;float displacement = (rand() % (int)(2 * offset * 100)) / 100.0f - offset;float x = sin(angle) * radius + displacement;displacement = (rand() % (int)(2 * offset * 100)) / 100.0f - offset;float y = displacement * 0.4f; // keep height of asteroid field smaller compared to width of x and zdisplacement = (rand() % (int)(2 * offset * 100)) / 100.0f - offset;float z = cos(angle) * radius + displacement;model = glm::translate(model, glm::vec3(x, y, z));// 2. scale: Scale between 0.05 and 0.25ffloat scale = static_cast<float>((rand() % 20) / 100.0 + 0.05);model = glm::scale(model, glm::vec3(scale));// 3. rotation: add random rotation around a (semi)randomly picked rotation axis vectorfloat rotAngle = static_cast<float>((rand() % 360));model = glm::rotate(model, rotAngle, glm::vec3(0.4f, 0.6f, 0.8f));// 4. now add to list of matricesmodelMatrices[i] = model;}// configure instanced array// -------------------------unsigned int buffer;glGenBuffers(1, &buffer);glBindBuffer(GL_ARRAY_BUFFER, buffer);glBufferData(GL_ARRAY_BUFFER, amount * sizeof(glm::mat4), &modelMatrices[0], GL_STATIC_DRAW);// set transformation matrices as an instance vertex attribute (with divisor 1)// note: we're cheating a little by taking the, now publicly declared, VAO of the model's mesh(es) and adding new vertexAttribPointers// normally you'd want to do this in a more organized fashion, but for learning purposes this will do.// -----------------------------------------------------------------------------------------------------------------------------------for (unsigned int i = 0; i < rock.meshes.size(); i++){unsigned int VAO = rock.meshes[i].VAO;glBindVertexArray(VAO);// set attribute pointers for matrix (4 times vec4)glEnableVertexAttribArray(3);glVertexAttribPointer(3, 4, GL_FLOAT, GL_FALSE, sizeof(glm::mat4), (void*)0);glEnableVertexAttribArray(4);glVertexAttribPointer(4, 4, GL_FLOAT, GL_FALSE, sizeof(glm::mat4), (void*)(sizeof(glm::vec4)));glEnableVertexAttribArray(5);glVertexAttribPointer(5, 4, GL_FLOAT, GL_FALSE, sizeof(glm::mat4), (void*)(2 * sizeof(glm::vec4)));glEnableVertexAttribArray(6);glVertexAttribPointer(6, 4, GL_FLOAT, GL_FALSE, sizeof(glm::mat4), (void*)(3 * sizeof(glm::vec4)));glVertexAttribDivisor(3, 1);glVertexAttribDivisor(4, 1);glVertexAttribDivisor(5, 1);glVertexAttribDivisor(6, 1);glBindVertexArray(0);}// render loop// -----------while (!glfwWindowShouldClose(window)){// per-frame time logic// --------------------float currentFrame = static_cast<float>(glfwGetTime());deltaTime = currentFrame - lastFrame;lastFrame = currentFrame;// input// -----processInput(window);// render// ------glClearColor(0.1f, 0.1f, 0.1f, 1.0f);glClear(GL_COLOR_BUFFER_BIT | GL_DEPTH_BUFFER_BIT);// configure transformation matricesglm::mat4 projection = glm::perspective(glm::radians(45.0f), (float)SCR_WIDTH / (float)SCR_HEIGHT, 0.1f, 1000.0f);glm::mat4 view = camera.GetViewMatrix();asteroidShader.use();asteroidShader.setMat4("projection", projection);asteroidShader.setMat4("view", view);planetShader.use();planetShader.setMat4("projection", projection);planetShader.setMat4("view", view);// draw planetglm::mat4 model = glm::mat4(1.0f);model = glm::translate(model, glm::vec3(0.0f, -3.0f, 0.0f));model = glm::scale(model, glm::vec3(4.0f, 4.0f, 4.0f));planetShader.setMat4("model", model);planet.Draw(planetShader);// draw meteoritesasteroidShader.use();asteroidShader.setInt("texture_diffuse1", 0);glActiveTexture(GL_TEXTURE0);glBindTexture(GL_TEXTURE_2D, rock.textures_loaded[0].id); // note: we also made the textures_loaded vector public (instead of private) from the model class.for (unsigned int i = 0; i < rock.meshes.size(); i++){glBindVertexArray(rock.meshes[i].VAO);glDrawElementsInstanced(GL_TRIANGLES, static_cast<unsigned int>(rock.meshes[i].indices.size()), GL_UNSIGNED_INT, 0, amount);glBindVertexArray(0);}// glfw: swap buffers and poll IO events (keys pressed/released, mouse moved etc.)// -------------------------------------------------------------------------------glfwSwapBuffers(window);glfwPollEvents();}glfwTerminate();return 0;
}// process all input: query GLFW whether relevant keys are pressed/released this frame and react accordingly
// ---------------------------------------------------------------------------------------------------------
void processInput(GLFWwindow *window)
{if (glfwGetKey(window, GLFW_KEY_ESCAPE) == GLFW_PRESS)glfwSetWindowShouldClose(window, true);if (glfwGetKey(window, GLFW_KEY_W) == GLFW_PRESS)camera.ProcessKeyboard(FORWARD, deltaTime);if (glfwGetKey(window, GLFW_KEY_S) == GLFW_PRESS)camera.ProcessKeyboard(BACKWARD, deltaTime);if (glfwGetKey(window, GLFW_KEY_A) == GLFW_PRESS)camera.ProcessKeyboard(LEFT, deltaTime);if (glfwGetKey(window, GLFW_KEY_D) == GLFW_PRESS)camera.ProcessKeyboard(RIGHT, deltaTime);
}// glfw: whenever the window size changed (by OS or user resize) this callback function executes
// ---------------------------------------------------------------------------------------------
void framebuffer_size_callback(GLFWwindow* window, int width, int height)
{// make sure the viewport matches the new window dimensions; note that width and // height will be significantly larger than specified on retina displays.glViewport(0, 0, width, height);
}// glfw: whenever the mouse moves, this callback is called
// -------------------------------------------------------
void mouse_callback(GLFWwindow* window, double xposIn, double yposIn)
{float xpos = static_cast<float>(xposIn);float ypos = static_cast<float>(yposIn);if (firstMouse){lastX = xpos;lastY = ypos;firstMouse = false;}float xoffset = xpos - lastX;float yoffset = lastY - ypos; // reversed since y-coordinates go from bottom to toplastX = xpos;lastY = ypos;camera.ProcessMouseMovement(xoffset, yoffset);
}// glfw: whenever the mouse scroll wheel scrolls, this callback is called
// ----------------------------------------------------------------------
void scroll_callback(GLFWwindow* window, double xoffset, double yoffset)
{camera.ProcessMouseScroll(static_cast<float>(yoffset));
}
相关文章:
第二十三章 opengl之高级OpenGL(实例化)
OpenGL实例化实例化数组绘制小行星带实例化 综合应用。 如果绘制了很多的模型,但是大部分的模型包含同一组顶点数据,只是不同的世界空间变换。 举例:一个全是草的场景,每根草都是一个包含了几个小三角形的模型。需要绘制很多根草…...

C++ String类总结
头文件 #include <string>构造函数 default (1) basic_string();explicit basic_string (const allocator_type& alloc); copy (2) basic_string (const basic_string& str);basic_string (const basic_string& str, const allocator_type& alloc); su…...

内网升级“高效安全”利器!统信软件发布私有化更新管理平台
随着数字化的深度推进,信息安全重要性进一步凸显。建设自主可控的国产操作系统,提升信息安全自主能力,已成为国家重要战略之一。 操作系统安全对计算机系统的整体安全发挥着关键作用,各类客户往往需要在第一时间获取更新与安全补…...

JAVA开发(自研项目的开发与推广)
https://live.csdn.net/v/284629 案例背景: 作为JAVA开发人员,我们可以开发无数多的web项目,电商系统,小程序,H5商城。有时候作为技术研发负责人,项目做成了有时候也需要对内进行内测,对外进行…...
Mysql用户权限分配详解
文章目录MySQL 权限介绍一、Mysql权限级别分析(1)全局级别(1.1) USER表的组成结构(1.1.1) 用户列(1.1.2) 权限列(1.1.3) 安全列(1.1.4)…...

【TypeScript 入门】13.枚举类型
枚举类型 枚举类型:定义包含被命名的常量的集合。比如 TypeScript 支持枚举数字、字符两种常量值类型。 使用方式: enum + 枚举名字 + 花括弧包裹被命名了的常量成员: enum Size {S,M,L } const a = Size.M console.log(Size, Size)...
Python科学计算:偏微分方程1
首先,我们来看初边值问题:伯格斯方程:假设函数是定义在上的函数,且满足:右侧第一项表示自对流,第二项则表示扩散,在许多物理过程中,这两种效应占据着主导地位,为了固定一…...
PLS-DA分类的实现(基于sklearn)
目录 简单介绍 代码实现 数据集划分 选择因子个数 模型训练并分类 调用函数 简单介绍 (此处取自各处资料) PLS-DA既可以用来分类,也可以用来降维,与PCA不同的是,PCA是无监督的,PLS-DA是有监督的…...
常用hook
Hook 是 React 16.8 的新增特性。它可以让你在不编写 class 的情况下使用 state 以及其他的 React 特性。理解:hook是react提供的函数API官方提供的hook基础hookuseState APIconst [state, setState] useState(initialState); //返回state值 以及更新state的方法 …...
TryHackMe-GoldenEye(boot2root)
GoldenEye 这个房间将是一个有指导的挑战,以破解詹姆斯邦德风格的盒子并获得根。 端口扫描 循例nmap Web枚举 进入80 查看terminal.js 拿去cyberchef解码 拿着这组凭据到/sev-home登录 高清星际大战 POP3枚举 使用刚刚的凭据尝试登录pop3 使用hydra尝试爆破 这…...

Elasticsearch基本安全加上安全的 HTTPS 流量
基本安全加上安全的 HTTPS 流量 在生产环境中,除非您在 HTTP 层启用 TLS,否则某些 Elasticsearch 功能(例如令牌和 API 密钥)将被禁用。这个额外的安全层确保进出集群的所有通信都是安全的。 当您在模式下运行该elasticsearch-ce…...
C语言-程序环境和预处理(2)
文章目录预处理详解1.预定义符号2.#define2.1#define定义的标识符2.2#define定义宏2.3#define替换规则注意事项:2.4#和###的作用##的作用2.5带副作用的宏参数2.6宏和函数的对比宏的优势:宏的劣势:宏和函数的一个对比命名约定3.undef4.条件编译…...
JVM 收集算法 垃圾收集器 元空间 引用
文章目录JVM 收集算法标记-清除算法标记-复制算法标记-整理算法JVM垃圾收集器Serial收集器ParNew收集器Parallel Scavenge /Parallel Old收集器CMS收集器Garbage First(G1)收集器元空间引用强引用软引用弱引用虚引用JVM 收集算法 前面我们了解了整个堆内存实际是以分代收集机制…...
clip精读
开头部分 1. 要点一 从文章题目来看-目的是:使用文本监督得到一个可以迁移的 视觉系统 2.要点二 之前是 fix-ed 的class 有诸多局限性,所以现在用大量不是精细标注的数据来学将更好,利用的语言多样性。——这个方法在 nlp其实广泛的存在&…...
vue 首次加载慢优化
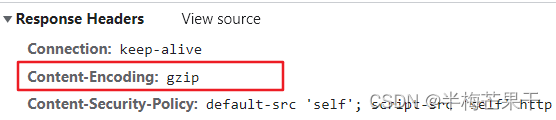
目前使用的是vue2版本 1.路由懒加载(实现按需加载) component: resolve > require([/views/physicalDetail/index], resolve)2.gzip压缩插件(需要运维nginx配合) 第一步,下载compression-webpack-plugin cnpm i c…...

WuThreat身份安全云-TVD每日漏洞情报-2023-03-21
漏洞名称:CairoSVG 文件服务器端请求伪造 漏洞级别:严重 漏洞编号:CVE-2023-27586 相关涉及:CairoSVG 在 2.7.0 版本之前 漏洞状态:POC 参考链接:https://tvd.wuthreat.com/#/listDetail?TVD_IDTVD-2023-06718 漏洞名称:WP Meta SEO WordPress 授权不当导致任意重定向 漏洞级…...

【Android -- 开发工具】Xshell 6 安装和使用教程
一、简介 Xshell 其实就是一个远程终端工具,它可以将你的个人电脑和你在远端的机器连接起来,通过向 Xshell 输入命令然后他通过网络将命令传送给远端Linux机器然后远端的Linux机器将其运行结果通过网络传回个人电脑。 二、Xshell 6 的安装 首先&#…...
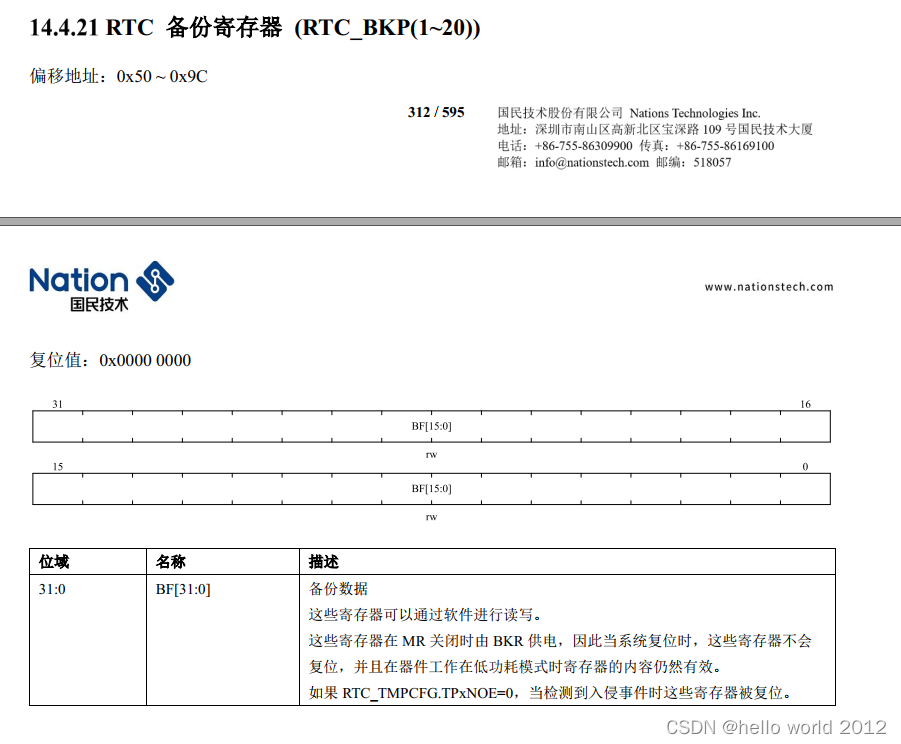
国民技术RTC备份寄存器RTC_BKP
根据手册资料知道RTC_BKP的地址,代码如下 #include "main.h" #include "usart.h"void USART2_Configuration(void) {USART_InitType USART_InitStructure;GPIO_InitType GPIO_InitStructure;GPIO_InitStruct(&GPIO_InitStructure);RCC_Ena…...
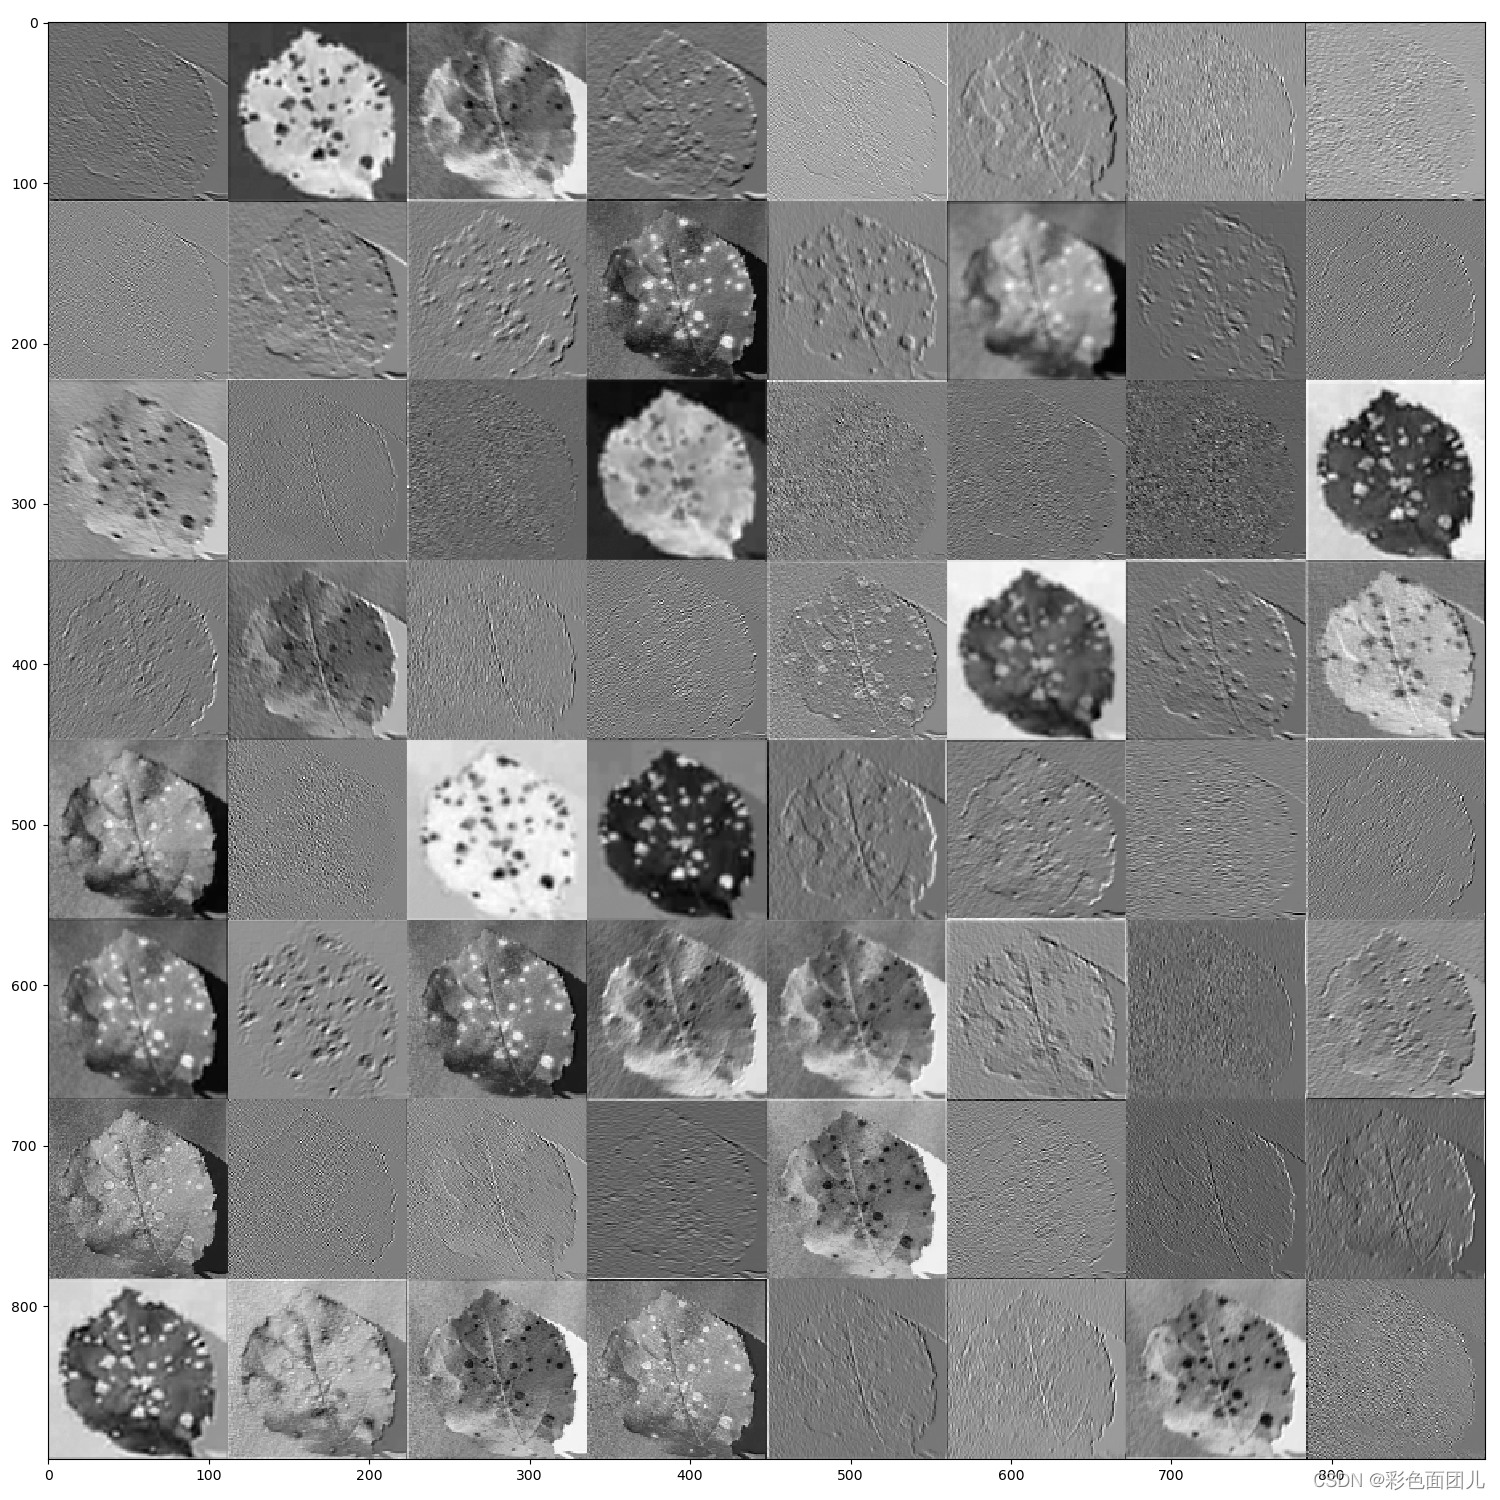
resnet网络特征提取过程可视化
我们在训练图片时,是不是要看看具体提取时的每个特征图提取的样子,找了很多,终于功夫不负有心人,找到了,通过修改的代码: resnet代码: import torch import torch.nn as nn from torchvision…...
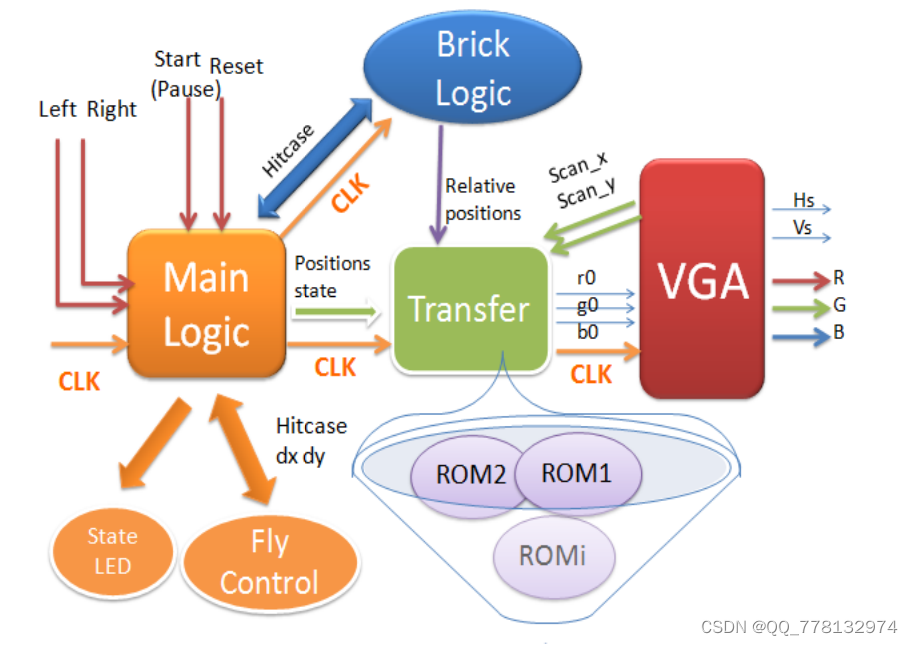
FPGA打砖块游戏设计(有上板照片)VHDL
这是一款经典打砖块游戏,我们的努力让它更精致更好玩,我们将它取名为打砖块游戏(Flyball),以下是该系统的一些基本功能: 画面简约而经典,色彩绚丽而活泼,动画流畅 玩家顺序挑战3个不同难度的级别,趣味十足 计分功能,卡通字母数字 4条生命值,由生命条显示…...

终极指南:如何用Save Image as Type一键转换网页图片格式
终极指南:如何用Save Image as Type一键转换网页图片格式 【免费下载链接】Save-Image-as-Type Save Image as Type is an chrome extension which add Save as PNG / JPG / WebP to the context menu of image. 项目地址: https://gitcode.com/gh_mirrors/sa/Sav…...

项目分享|VibeVoice:微软开源的前沿语音AI
引言 在语音合成(TTS)技术领域,长篇幅、多说话者、低延迟的自然语音生成一直是行业痛点。传统TTS模型往往受限于生成时长、说话者数量或实时响应速度,难以满足播客制作、智能对话等复杂场景需求。微软开源的VibeVoice框架彻底打破…...
)
uni-app小程序开发必备:纯TypeScript实现4种UUID生成方案(无npm依赖)
uni-app小程序开发实战:零依赖TypeScript实现4种UUID生成方案 在uni-app跨平台开发中,小程序环境对npm库的支持限制常常让开发者头疼。特别是在需要生成唯一标识符的场景下,传统依赖uuid库的方案往往无法直接使用。本文将带你从底层原理出发&…...

猫抓浏览器插件:网页资源嗅探与下载的终极解决方案
猫抓浏览器插件:网页资源嗅探与下载的终极解决方案 【免费下载链接】cat-catch 猫抓 chrome资源嗅探扩展 项目地址: https://gitcode.com/GitHub_Trending/ca/cat-catch 你是否曾在浏览网页时,看到精彩的视频、音频或图片资源,却苦于无…...

深入解析Golang中的占位符:%w、%v、%s的应用与最佳实践
1. Golang占位符基础入门 刚开始接触Golang时,fmt包里的那些百分号开头的占位符确实让我有点懵。记得第一次看到%s、%v、%w这些符号时,我还以为是什么特殊运算符。后来在实际项目中用多了才发现,这些看似简单的占位符,其实是Gola…...

Unity引擎开发过的VR大场景项目网络技术,资源处理及热更新方案的报价大概多少
根据最新的市场招标数据、行业报价案例和技术方案分析,针对VR大场景项目的网络技术、资源处理、热更新方案三大模块的报价,整理如下:一、网络技术方案报价 网络技术方案主要解决多人在线同步、远程渲染、低延迟通信等问题。方案类型技术选型报…...

LibreHardwareMonitor:5分钟掌握免费开源硬件监控的终极指南
LibreHardwareMonitor:5分钟掌握免费开源硬件监控的终极指南 【免费下载链接】LibreHardwareMonitor Libre Hardware Monitor, home of the fork of Open Hardware Monitor 项目地址: https://gitcode.com/GitHub_Trending/li/LibreHardwareMonitor 想要实时…...
——基于asp+sqlserver的WEB社区论坛设计与实现)
asp毕业设计下载(全套源码+配套论文)——基于asp+sqlserver的WEB社区论坛设计与实现
基于aspsqlserver的WEB社区论坛设计与实现(毕业论文程序源码) 大家好,今天给大家介绍基于aspsqlserver的WEB社区论坛设计与实现,更多精选毕业设计项目下载见文末哦。 文章目录: 基于aspsqlserver的WEB社区论坛设计与…...

zotero-style:智能文献管理在学术研究中的创新实践
zotero-style:智能文献管理在学术研究中的创新实践 【免费下载链接】zotero-style zotero-style - 一个 Zotero 插件,提供了一系列功能来增强 Zotero 的用户体验,如阅读进度可视化和标签管理,适合研究人员和学者。 项目地址: ht…...

LabVIEW新手避坑指南:用For循环和数组搞定水仙花数,别再手动算啦!
LabVIEW实战:用For循环与数组高效求解水仙花数的5个关键技巧 水仙花数这个经典的编程练习题,在文本编程语言中可能只需十几行代码,但切换到LabVIEW的图形化编程环境时,不少初学者会陷入连线混乱和逻辑纠结。本文将从实际工程视角…...